Scanning
In the previous post, we set up the environment to start our first hacking. Now, in this post, we are actually going to start hack the image. The first step is to gather as much information as you can about the target you are hacking. There might be 0 possibilities of hacking or there might be number of possibilities to hack. As you know, the image we are trying to hack is of difficulty 1, so there are couple of ways to gain access to the system.
Note: I am using root user for all commands. You can gain root access by “sudo su” command.
Finding the IP address of Kali Linux
First of all, we have to identify the IP address of the target to be hacked. Also, since you are using NAT on both Kali Linux and Kioptrix, you know that they are on the same network. Therefore, we have to identify the IP address of Kali Linux (attacker) and Kioptrix (target). For that, we have a Linux command “ip address” or “ifconfig” whichever you like. “ifconfig” might not come with the newer versions of Kali Linux.
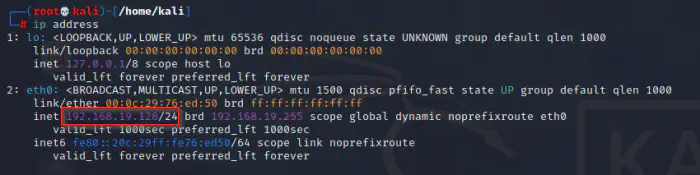
During my run, it showed that my IP address is 192.168.19.128 with subnet mask prefix 24. Now, this means that the network is 192.168.19.0/24.
Finding IP address of Kioptrix
Now, the next step would be to find the IP address of the target machine, Kioptrix. This can be done by a number of tools like netdiscover, fping, etc. However, I would use fping which is my favourite one.
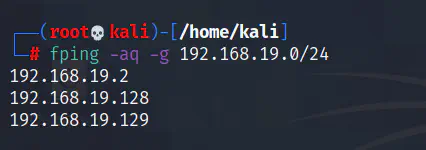
In the command above, I have used -a flag to list out the alive hosts of the network only. Similarly, -q stands for a quiet mode which gives a less verbose output. In Linux, you can combine multiple short flags into one. For example, -aq is the same as -a -q. Also, -g means to generate the result for the network supplied next to it.
So, as we saw above, there are three hosts on the network. My inspection is that the first one is the gateway for the NAT, the second one is the attacker machine as we found out using the IP address and the third one is the target. In this way, we narrowed down the search.
Now, if you are already familiar with pentesting, and you might be saying to yourself that you can use nmap for ranges of IP addresses. Yes, you are right, but my intent is to teach some tools and be more specific about targets.
Running Nmap
Up to now, you know your network and the target to hack. Now, let’s scan for some open ports on the target machine. If you do some research on ports, you would know that ports relate to services on a machine. A service accessible on a network is linked to a port. For example, the default port for MySQL is 3306. Likewise, the port for a web server is 80.
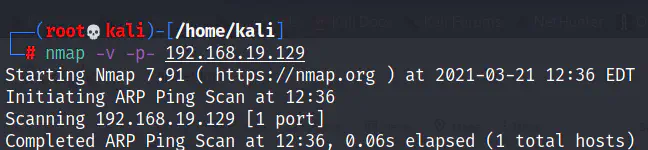
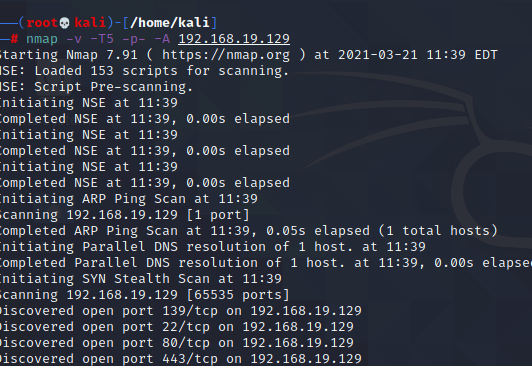
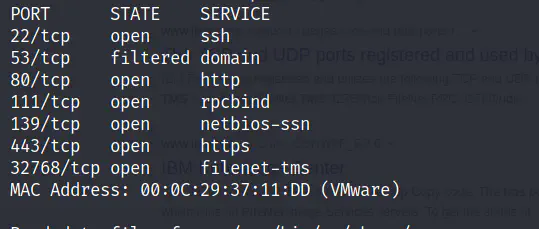
In the above command, -v means verbose output and -p- tells Nmap to scan all ports of 192.168.19.129. This will gives us the following after the code execution.
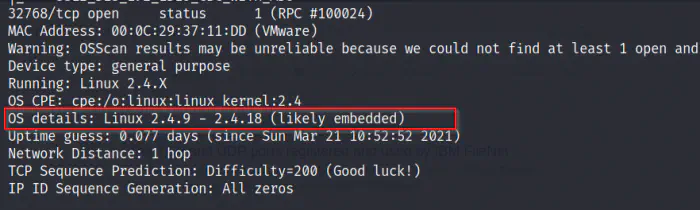
Now, we can use Nmap once again to scan these open ports only but this time we will get detailed information using -A flag.

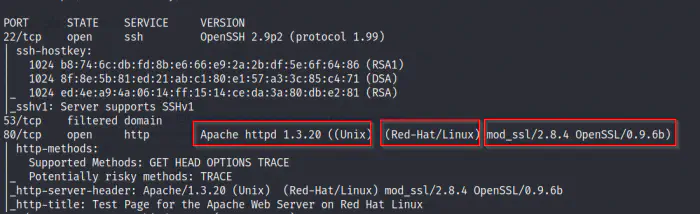
In the screenshot above, you saw that the version of Apache is 1.3.20 which is running on Red-Hat Linux with mod_ssl plugin of version 2.8.4. This is an important information to note down.
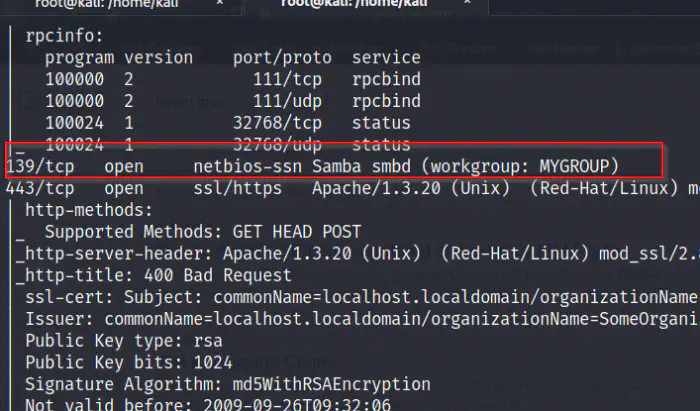
We also saw a service running at port 139 which is the SMB. Likewise, this might be a potential information. There are other information available as well.
A shortcut for all these steps
If you are a lazy bone, then you can simply use the following command to get the final result. However, this lists all open ports of alive hosts which will take a lot of time.

I will see you in the next part.